Cosmic Charger Fuel Dragster 1:25 Scale MPC Model Kit #826 Review

2015 October 1
by Doug

Right On Replicas, LLC Step-by-Step Review 20151001*
Cosmic Charger Dragster 1:25 Scale MPC Model Kit #826 Review
000

Review and Photos by Doug Bartley Doug Bartley Thumbnail

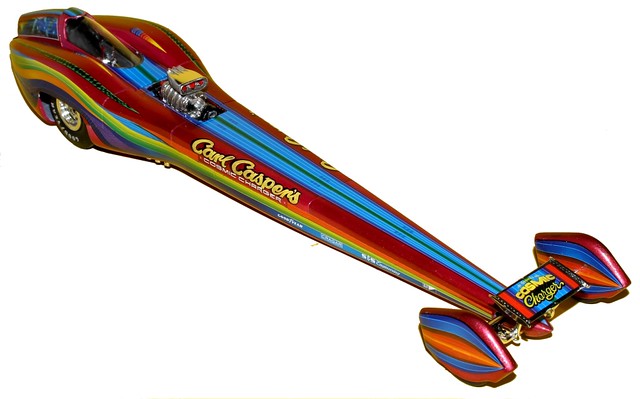
The Real Cosmic Charger came out of Carl Casper’s busy custom shop. It was a super long, low and sleek stream liner. One of the most striking features of this outstanding machine is it’s super wild paint job by Casper, which consists of a very unique blending of over 30 exotic shades of lacquer. The chassis was fabricated by S & S Engineering, ignition by Mallory, Cragar wheels and blower drive, lettering by Kampney and tires by Goodyear. 1971 – Category: Topfuel, Type: TN, Class: AA/FD, Div: 3 “Carl Caspers Cosmic Charger Streamliner” Owned by Carl Casper from Kentucky USA Dragster by Logghe Stamping Co. | Powered by a 426 cubic inch Chrysler Hemi with direct driveline. 1/4 Mile ET: 6.670 and 1/4 Mile Speed: 220.45 MPH. Carl Casper spent many years building custom machines, winning many National awards and he formed his most exciting company “Hollywood Productions” and produced the newer Bat Mobile, General Lee, and the A-Team van among others. some of his other customs were, The Popcorn Wagon, Peanut Wagon, Beer Wagon, Vanturian, and many more.


For the Modeler: This review covers the MPC re-release (Re-Pop) of Carl Casper’s Cosmic Charger 1:25 Scale MPC Model Kit #826. In June 2015, MPC’s design team was not satisfied to merely reissue the Cosmic Charger as it was. Instead, they teamed up with Carl Pic 1 
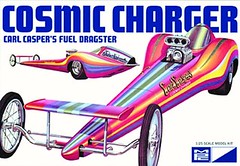
Casper himself to add some fabulous NEW options to this historic vintage model. This kit now includes: a complete 10-piece front mounted blower setup, motor cover and enclosed front wheel fairings! Add in an amazingly accurate all-new decal sheet and modelers can build a much more exciting and authentic model of America’s most beautiful Dragster! This kit features: Parts molded in white styrene, 15 new parts added along with Pad-printed drag slicks and a full color decal sheet with all-new graphics Full Retro Deluxe™ vintage MPC packaging Bonus mini display box & full color collector’s info card. Overall dimensions are: Length: 12” Width: 2½” Height: 2¼”.


Covered in this Review: If you want to perfect your build; basic construction; preparing parts for better finishing; alternate assembly sequence suggestions for fit and ease of finishing; complete paint and adhesive selections and applications; test fitting; detailing the engine; front suspension build sequence; kit extra items described; using “clear” glue for window glass installation; Gravity Finish front wheel version consideration; mold seam and sink mark identification and repair; correct header orientation and installation; chassis installation; chassis to body installation technique; blower version consideration; customizing the blower with realistic butterflies; removing unwanted script; converting an aftermarket wired distributor to a magneto; engine wiring details; clamping methods; using decal setting solutions for that “painted on” look; cockpit window detailing; using Gravity Colors paints; fuel line modifications for fit; making realistic tires; expanded 1:1 vehicle and kit history; modifying the header and rear wheel openings for fit; wheel pant construction; ‘crystal clear’ window glass installation; decal preparation and application; using decal setting solution for that “painted on” look; complete engine construction and finishing; suspension construction and detailing; are all fully examined in this 25 page, full-color Step-by-Step review in PDF format.


100% money back guarantee!

Click the Buy Now link below to purchase the full Step-by-Step review for $2.95 USD.


Important – You MUST click on the “Return to Right on Replicas, LLC” link after you’ve made your purchase to download your review!


Right On Replicas, LLC ©2015 All rights reserved. *All registered trademarks are the property of their respective brands. Follow the manufacturer’s safety recommendations for any product mentioned here.

Tiger I (Panzerkampfwagen VI Ausfuehrung E Early Version) 1:35 Scale Tamiya Model Kit #MM-156

2015 September 29
by Doug

Right On Replicas, LLC SnapShot Review 20150929*  Tiger I (Panzerkampfwagen VI Ausfuehrung E Early Version) 1:35 Scale Tamiya Model Kit #MM-156
Tiger I Front

Review and Photos by Steven Hardwick Steven Hardwick

Developed through discussion’s with Hitler starting in May 1941, Germany needed a tank with a gun that could penetrate 100mm (4″) of armor at a distance or 1500 m (1640 yards) or roughly 15 football fields. On April 20th, for Hitler’s birthday, the first prototypes went through field trials. By November 1942 the production rate was up to 25 per month. These were the Pz. Kpfw 4501(H) a predecessor to the Tiger I. Some of the drawbacks of the Tiger I were transport capability and a short range of action due to a fuel consumption rate of 2¾ gallons per mile along with a slow turret traverse. Hitler started using them as a defensive role as their amazing frontal armor enabled them to roll head on into the allied tank forces with little or no damage inflicted.


For the Modeler: This review covers the Tiger I (Panzerkampfwagen VI Ausfuehrung E Early Version) 1:35 Scale Tamiya Model Kit # MM-156. Re-released in 2009, it has been discontinued but is still available at online auctions. It has been previously released as Tiger I motorized version so this kit has been around for quite a while. I would rate this as a Skill Level 2 for intermediate builders.  The kit has a nice piece count with tree numbers easily read and understood for piece placement The instructions are clear enough that even a beginner can build it straight from the box however. Some wonderful decals are included to make one of four versions, two for European Front (231 & S02) and two for the African Front versions (102 & 142). You also get the division markings Heavy Tank Battalion, 501st and Wehrmacht, along with a nice basic painting guide to follow. The kit includes the accessories needed to really make this tank look realistic i.e., a shovel, separate tow cables (on top of body) and movable turret which can be made with hatches open or closed along with the driver and gunner hatches.


Construction: As per Tamiya’s standards the fit and finish is wonderful, very little clean up is required. It comes molded in a very close German grey. It also comes with two figures, nicely detailed one piece each. They look fantastic in the completed model; the lower hull is one piece ready for the road wheels and drive gear. This is where taking a little time and test fitting the road wheels on the guide really pays off. The pair of tracks are one-piece rubber units (one on each side) and they suggest using a hot knife to seal the tracks when finished. Standard Model Master glue was used for construction and Microsol setting solution for the decals.


Overall: Building this tank is an absolute dream as most of Tamiya’s kits are. That being said however, take heed to do this one step that will make your building experience either a great one or a good one. In the kit they give you a “road wheel guide”. Please use the guide as it will help in more ways than one. The only thing I didn’t like were the tow cables on the sides of the tank molded to the body (losing a little detail).
Tiger I Rear
Right On Replicas, LLC ©2015 All rights reserved. *All registered trademarks are the property of their respective brands. Follow the manufacturer’s safety recommendations for any product mentioned here.

Ferrari California (Open Top) 1:24 Scale Revell Model Kit #85-4291 Review

2015 September 28
by Doug

Right On Replicas, LLC Step-by-Step Review 20150928*
Ferrari California (Open Top) 1:24 Scale Revell Model Kit #85-4291 Review
000

Review and Photos by Alan Mann Alan Mann (Thumbnail)

The California is a GT sports car produced by Ferrari. It is a two door “2+2” hard top convertible. The California was launched at the 2008 Paris Motor Show. According to industry rumors, the California originally started as a concept for a new Maserati, but the resulting expense to produce the car led the Fiat Group to badge it as a Ferrari in order to justify the high cost of purchase; the company denies this, however. The California represents a new, fourth model range for the company and revives the “California” name used for the late-1950s Ferrari 250 GT and the 1960s Ferrari 365. When originally released, the California was powered by a front-mid mounted gasoline direct injection 4.3 L V8. The existing production line produces 27 cars per day, or 6,000 per year. Throughout California’s production, only 2 cars have been built with manual transmission.


For the Modeler: This review covers the Revell re-release (Re-Pop) of the Ferrari California. This is Kit #85-4291 in the current catalog and was released in 2010, it has been discontinued but is still available in online stores. The kit is 1/24 scale and Revell 1 rates this as a Skill Level 2 for intermediate builders. There have been different box art versions in both Revell USA and Revell Germany versions. There are 111 parts molded in White, Chrome, Clear and includes Rubber tires. The build has a complete motor that represents the 4.3L V8 and is well detailed. The interior is a multiple part assembly and has full decals for all details. The body is a good representation of the car and there are few if any mold lines or blemishes. The chassis is typical Ferrari and a full plate. The instructions are in Revell book format and assembly sequences are clearly defined. The decal sheet has USA markings and is a cut down version of the Germany version with a collection of European tags. Overall dimensions are: Length: 7-1/2” Width: 2-3/4”, Height: 2-1/4”.


Covered in this Review: If you want to perfect your build; basic construction; preparing parts for better finishing; alternate assembly sequence suggestions for fit and ease of finishing; complete paint and adhesive selections and applications; test fitting; detailing the engine bay; highlighting the dashboard; authentic interior color scheme; wheel spindle installation; front suspension Gravity Finish build sequence; using flocking to simulate carpeting; making custom floor mats and license plates; dashboard detailing; Euro vs. US version considerations; gauge deal map; flocking the carpet for optional interior realism; modifying the hood for function; how to detail the turn signal lenses; using “clear” glue for window glass installation; front/rear tire differentiation; mold seam identification and repair; correct brake caliper orientation; chassis installation; painting the shocks for realism; where NOT to use glue; correctly orienting directional tires; a hassle free chassis to body installation technique; using decal setting solutions for that “painted on” look; window surround detailing; making realistic tires; a ‘crystal clear’ window glass treatment; hood hinge considerations; complete engine construction and finishing; suspension construction and detailing; are all fully examined in this 18 page, full-color Step-by-Step review in PDF format.


100% money back guarantee!

Click the Buy Now link below to purchase the full Step-by-Step review for $2.95 USD.


Important – You MUST click on the “Return to Right on Replicas, LLC” link after you’ve made your purchase to download your review!


Right On Replicas, LLC ©2015 All rights reserved. *All registered trademarks are the property of their respective brands. Follow the manufacturer’s safety recommendations for any product mentioned here.