1947 Chevrolet Fleetmaster Aerosedan 1:25 Scale Galaxie Ltd Model Kit #13012 Review

2015 September 24
by Doug

Right On Replicas, LLC Step-by-Step Review 20150924*
1947 Chevrolet Fleetmaster Aerosedan 1:25 Scale Galaxie Ltd Model Kit #13012 Review
000

Review and Photos by Alan Mann Alan Mann (Thumbnail)

The Chevrolet Fleetmaster was produced by Chevrolet for the 1946 to 1948 model years. The Fleetmaster series included the Fleetline sub-series which was offered only in 2-door and 4-door “fastback” body styles. The Series DK Fleetmaster was introduced as the top trim level model in the 1946 Chevrolet range, along with the lower level Series DJ Chevrolet Stylemaster. The Fleetmaster, which replaced the “prewar” Chevrolet Special Deluxe, was powered by a 216.5 cu in (3.5 L) Straight-six engine with a 3 speed manual transmission. It was offered in 2-door Town Sedan, 4-door Sport Sedan, 2-door Sports Coupe, 2-door Convertible and 4-door Station Wagon models. A Fleetline sub-series was available as the 2-door Aero Sedan and 4-door Sport Master Sedan, both of which featured “fastback” styling and additional triple moldings on all fenders. The 1947 Series 2100 EK Fleetmaster was little changed from its predecessor, the most notable visual difference being a new radiator grille with a more horizontal theme.


For the Modeler: This review covers the 1/25 Scale GALAXIE LIMITED 1947 Chevrolet Fleetmaster Aerosedan. This is Kit #13012 in the current catalog and is a 2015 New Release. I did find in researching this kit it was one of a few different releases of the kit. 1Galaxie has re-boxed this with additional parts and created multiple kits from the same molds. This is very common in the model industry and so this is a New Release version of a similar kit. Galaxie rates this as a Skill Level 3 recommended for experienced modelers. In the box you get around 165 parts molded in White, Chrome, Clear, Clear Red and Vinyl tires. This is a true 3-in-1 customizing kit that can be built as stock, custom or racing versions. It has authentic looking black vinyl tires with press-in wide whitewall inserts. Trim parts are included to build 1946, 1947 or 1948 model years. Decals are from Scale Master and include Country Club Woodside trim. You have the choice of stock or lowered suspension heights. The model Gravity Finishincludes a  detailed Chevy “Stovebolt” six-cylinder engine that can be built stock or with optional speed equipment including three Stromberg 97 carburetors, Edelbrock racing intake manifold and chrome Wayne valve and tappet covers. It has a fully detailed interior with separate door handles, window cranks, armrests, pedals, finely engraved multi-piece instrument panel and seats. Some of the custom options are a windshield visor and fender skirts. The instructions are well laid out and easy to read, they include written instructions with the construction diagrams. On the back page you get customizing and specialty tips to create a better build. Overall dimensions are: Length 8”, Width: 3”, Height: 2-1/5”.


Covered in this Review: If you want to perfect your build; basic construction; preparing parts for a better finish; alternate assembly sequence suggestions for fit and ease of finishing; complete paint and adhesive selections and applications; test fitting; engine construction and detailing; how to make the “woody” look, detailed suspension construction and detailing; making realistic tires; interior detailing; stock/race decals are discussed; making custom license plates; mounting optional body parts; aligning the front clip; constructing and detailing the chassis; installing the driveline; engine options discussed, optional engine wiring methods; making realistic coil springs; identifying and repairing mold seams; overall race/stock version considerations; when NOT to use glue; adding engine bay details; how to detail the interior; professional engine bay touches; making a realistic looking dashboard; using floor polish for crystal clear “glass”; a method for damage-free chassis installation; how to use Bare Metal Foil for outstanding trim; using setting solution for decal application and that “painted on” look; using “clear” glue for windows; mold seam identification and repair; detailing the instrument panel; decal preparation and application; are all fully examined in this extensive 20 page, full-color Step-by-Step review in PDF format.


100% money back guarantee!

Click the Buy Now link below to purchase the full Step-by-Step review for $3.95 USD.


Important – You MUST click on the “Return to Right on Replicas, LLC” link after you’ve made your purchase to download your review!


Right On Replicas, LLC ©2015 All rights reserved. *All registered trademarks are the property of their respective brands. Follow the manufacturer’s safety recommendations for any product mentioned here.

Barnabas Vampire Van 1:25 Scale MPC Model Kit #763 Review

2015 September 22
by Doug

Right On Replicas, LLC Step-by-Step Review 20150922*
Barnabas Vampire Van 1:25 Scale MPC Model Kit #763 Review
000

Review and Photos by Alan Mann Alan Mann (Thumbnail)

Dark Shadows is an American soap opera that originally aired weekdays from June 27, 1966, to April 2, 1971. The show depicted the lives of the wealthy Collins family of Collinsport, Maine. The series became hugely popular when vampire Barnabas Collins appeared a year into its run. Barnabas Collins, arrives and takes the show in a new direction; his vampire curse introduces a new history of the Collins family. Part of this revised history is the popular character of the witch Angelique who’s jealously led to the tragic death of Barnabas’ great love Josette and who placed the curse upon Barnabas. Dark Shadows also featured ghosts, werewolves, zombies, man-made monsters, witches, warlocks, time travel, and a parallel universe. But the show never had a Vampire Van or automobile of the sort.

The Barnabas Vampire Van was a model of a hot rod hearse originally issued in 1969 by MPC to tie-in with the hit Dark Shadows ABC TV show. The base kit started life as a 32 Chevy panel van, while not actually in the show the van was a popular seller. MPC was known in the 60’s and 70’s to make many Tie-In kits of vehicles never seen in the shows, other examples are Hogan’s Hero’s Jeep, Welcome Back Kotter’s Grand Prix and Happy Days character Fonzie driving the Monkeemobile!


For the Modeler: This review covers the Round2 2011 re-release (Re-Pop) of the MPC Barnabas Vampire Van in 1/25 Scale. This is kit #MPC763 in the current catalog and although discontinued it is widely available online. Round2 considers this a Skill Level 3 for 1 Advanced builders. The kit has over 160 parts molded in White, Chrome and Clear and includes soft Rubber tires. There is a fairly detailed but simplified motor. Some extra wiring will go a long way on this. The chassis is a very nice replica of a 32 Chevy and the base for a Rat Rod build for those who “Kit-Bash”. Many of the suspension parts are nice quality for rods. The interior is overly simplistic and I would recommend flocking the floors. The body is quite detailed and a multiple piece unit. It has a ton of very cool details for the Gothic look! The rear door open also. The tires are very nice soft rubber with Pad-Printing. This build hinges on the exterior look. Also included is a coffin to make a trailer with and a figure for the coffin. While the figure is a little flat it is neat looking. The coffin details are nice and it would look great as a separate detail in a graveyard diorama! There are no decals for this kit. As with many of the MPC re-pops you get a Mini Box and a MPC sticker. Overall car dimensions: Length: 6-1/2”, Width 3”, height 3”.


Covered in this Review: If you want to perfect your build; basic construction; preparing parts for better finishing; alternate assembly sequence suggestions for fit and ease of finishing; abrasive choices; complete paint and adhesive selections and applications; test fitting; suspension construction; detailing the tires for realism; chassis construction and detailing; mounting the body to the chassis; coffin trailer construction; finishing the engine; interior color selection; making wood trim; finishing the Barnabus figure; engine construction and wiring, clarifying part placements; combining instruction steps for better finishing; original vehicle concept; modifying the body shell for fit; where “NOT” to use glue; optional; using white glue to make crystal clear window glass installations; are all fully examined in this 19 page, full-color Step-by-Step review in PDF format.


100% money back guarantee!

Click the Buy Now link below to purchase the full Step-by-Step review for $2.95 USD.


Important – You MUST click on the “Return to Right on Replicas, LLC” link after you’ve made your purchase to download your review!


Right On Replicas, LLC ©2015 All rights reserved. *All registered trademarks are the property of their respective brands. Follow the manufacturer’s safety recommendations for any product mentioned here.

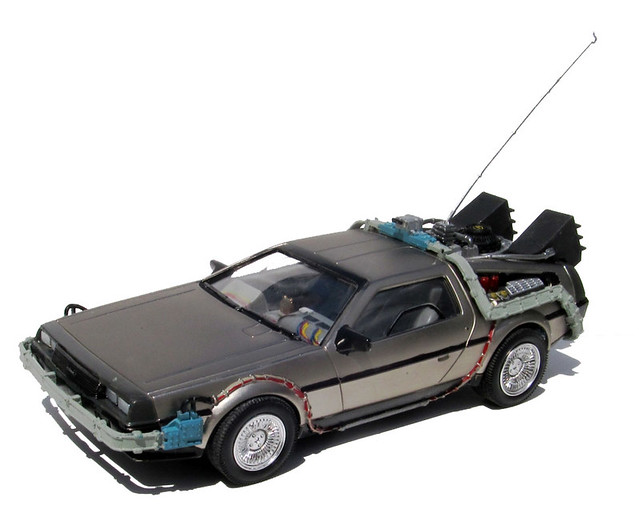
Time Machine Mk I (Original – Back To The Future) 1:25 Scale Polar Lights Model Kit #POL911 Review

2015 September 21
by Doug

Right On Replicas, LLC Step-by-Step Review 20150921*
Time Machine Mk I (Original – Back To The Future) 1:25 Scale Polar Lights Model Kit #POL911 Review
000


Review and Photos by Alan Mann Alan Mann (Thumbnail)

 Marty: “Wait a minute. Wait a minute. Doc, uh… Are you telling me that you built a time machine… out of a DeLorean?”

Doc: “Yes, the way I see it, if you’re gonna build a time machine into a car, why not do it with some style?”


The DeLorean time machine is a fictional automobile-based time travel device featured in the Back to the Future trilogy. In the feature film series, Dr. Emmett Brown builds a time machine from a DeLorean DMC-12 with the intent of gaining insights into history and the future but instead winds up using it to travel across 130 years of Hill Valley history (from 1885 to 2015) with Marty McFly, undoing the negative effects of time travel. For most of the first film, the 1.21 gigawatts are supplied by a plutonium-powered nuclear reactor and, with the absence of plutonium, a bolt of lightning channeled directly into the flux capacitor by a long pole and hook in the film’s climactic sequence. At the end of the first film, and for the remainder of the trilogy, the plutonium nuclear reactor is replaced by a “Mr. Fusion Home Energy Reactor” generator possibly acquired in 2015. The “Mr. Fusion” device apparently converts household waste into electrical power.


For the Modeler: This review covers the Snap-It kit # POL911 from Polar Lights/Round2 of the Time Machine from the Back To The Future movie. The kit is 1/25 scale and listed as a Skill Level 1 and it is a Snap Together kit but; the kit requires paint for detailing. The model includes about 50 parts molded in Gray, Clear, Chrome, Brushed Steel and it has Vinyl tires. This is a Re-Release (Re-Pop), SORT-OF, as it was released in multiple movie versions earlier under AMT and now done under Polar Lights. Polar Lights has updated the moldings to include a “Brushed Steel” looking body that more accurately depicts the Stainless Steel body. As with the previous AMT versions this one includes the original Plutonium Reactor as well as the Lightening Rod and “Mr. Fusion”. So in effect you can replicate multiple versions of the car with this one kit. The build is simplistic but painting is very tedious and detail specific. Go to the internet and download reference photos to give you a better idea as to how to properly paint it. The only decals are the license plates in the OUTATIME and BAR CODE versions that are stickers. Overall dimensions are: Length: 7”, Width: 4”, Height: 3”.


Covered in this Review: If you want to perfect your build; basic construction; preparing parts for better finishing; alternate assembly sequence suggestions for fit and ease of finishing; complete paint and adhesive selections and applications; test fitting; interior detailing and painting; complete engine construction and rear panel detailing; explaining instruction errors; making realistic tires; dashboard detailing and sourcing; front and rear suspension build sequence; chassis installation; the difference between front and rear tires; detailing the back panel; power plant version considerations; detailing the Plutonium power plant and lightening rod; removing unwanted copyright script; using “clear” glue for the windows and glass; using optional “clock story” props; comparative kit history; identifying and removing mold lines; license plate decal or sticker application; are all fully examined in this extensive 18 page, full-color Step-by-Step review in PDF format.


100% money back guarantee!

Click the Buy Now link below to purchase the full Step-by-Step review for $2.95 USD.


Important – You MUST click on the “Return to Right on Replicas, LLC” link after you’ve made your purchase to download your review!


Right On Replicas, LLC ©2015 All rights reserved. *All registered trademarks are the property of their respective brands. Follow the manufacturer’s safety recommendations for any product mentioned here.