Right On Replicas, LLC SnapShot Review 20150714*
P-51B Mustang 1:32 Scale Revell Model Kit #85-5535 Review
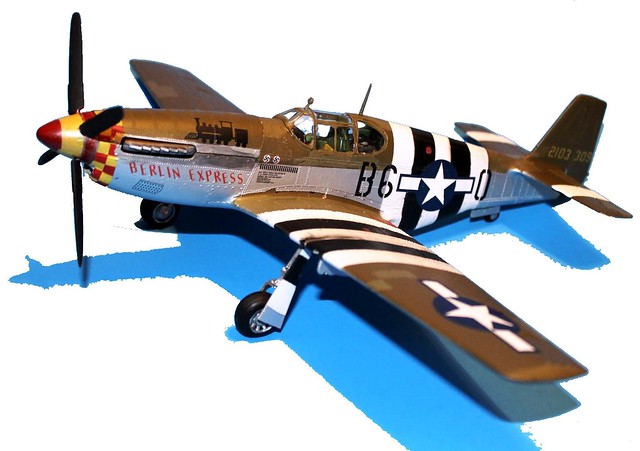
Review and Photos by Doug Bartley 
The P-51 Mustang was designed and produced by North American Aviation as a fighter and fighter-bomber. The first airframes rolled out in 1940 and by the end more than 15,000 units were produced. . They fought in every theatre of WWII and continued in service with dozens of countries for decades thereafter. Originally, the Mustangs were to be fitted with the Allison V-1710 engine, but that limited their performance at higher altitudes. The next version, the P-51B/C model, had a more powerful Rolls-Royce Merlin engine, which made them more formidable opponents against the Luftwaffe’s Bf-109s. The latest and final version of the Mustangs sported the Packard V-1650-7 engine, which was simply a license-built version of the even more powerful variation of the standard Merlin.
Â
For the Modeler: This review covers the Skill Level 2 P-51B Mustang 1:32 Scale Revell Model Kit #85-5535, re-released in 2015.  This kit has been issued in a number of different formats and is available everywhere. The model contains 64 parts with waterslide  decals and instructions. Kit features a detailed V-12 engine, seated pilot figure, multi-part canopy, and decals for two versions. First thing; this is not a new kit of super detailed and nicely molded parts. On the other hand it is attractively priced and will look great with some patience.
When I began the review of this kit I opened the box and looked over the four rather large gray styrene sprues (one each for the fuselage halves and other parts, and one of the lower wing and upper wing halves) and one bagged Clear sprue. I noticed little flash, and a few sink marks mainly on the fuselage (nothing major and easily corrected with a small amount of putty). Overall, it’s not a bad looking kit. Completed dimensions are: Length: 13.1â€, Wingspan: 13.6â€, Height: 5.0â€.   Looking closer at parts I found on one half of the fuselage interior and 1 of the rear stabilizers was a raised Revell Inc. and year 1980 mold marking. After thinking for a few moments I remember that I had built a Revell 1:32 P51 in the early 70’s and again in the late 80’s, both with a depressing outcome do to my meager skills in the 70’s and badly fitting parts so here is what I did…
First off I remember the fuselage halves fit was not great (lots of putty) but with having more years experience under my belt I proceeded with care. I didn’t build the cockpit as shown in the instructions as a complete unit and then installing in the right half. Instead I cleaned up the parts and proceeded in this fashion. 1st I taped (using small pieces of masking tape the fuselage halves together, then I installed the floor without glue, I then checked for gaps in the fuselage joints. There were some so I removed the floor and did some sanding of the edges and reinstalled it until no gaps were left.
Next, I added the rear battery shelf and did the same, followed by the fire wall and instrument panel. Once all of these components fit well I set them aside and tried the cockpit side walls. What I found here was that the locating pins were either positioned wrong or not lining up correctly, so these locators were cut off and I aligned them by eye, test fitting them with the floor in place…everything else fit well.
Secondly; I Â assembled the rest of the parts. The engine and the rear stabilizers went together nicely leaving me one last problem area the main wings. Here again the locating pins didn’t align correctly so I cut them off and glued the upper and lower wing parts together aligning them by the front edge. The rest of the build was straight forward and went together well. After assembling the fuselage halves and parts I allowed the fuselage to dry for a few days (I used rubber bands and tape to hold it together until dry). When dry I added the wings and to my surprise had little to no joint gap to fill. I didn’t add the main landing gear until after painting.
Final steps were to paint the exterior (interior parts being done following the instructions and before assembly. I used spray can Aluminum and Olive drab for the aircraft, masking and taping as needed. Once the plane dried for a few days since decals for the invasion stripes were not provided (only measurements) and had to be painted, I used 1/2″ tape and painted them on roughly using the measurements. The reason for the rough edges was because during the war prior to the invasion the planes had to have the stripes painted on and the time was short and the maintenance crews of each squadron had to paint them on using what was available mops, paint brushes, spray guns, etc. so they weren’t always exact and neat.  So,  if some paint oozed under the tape –  I left it that way, stripes a little crooked –  I left it too, and what other minor mess ups, I left it for the sake of authenticity….the rest of the decals were applied following a gloss clear paint.  I used Microscale system decal setting products and allowed the model to dry before the whole plane was sprayed with clear flat. When dry, the main landing gear were glued in and a few other minor pieces applied. The final step, before writing this review, was to put the canopy (consisting of 6 clear pieces and the rearview mirror on. This is by far, the hardest nerve-wracking part for me (but using Testors Clear parts maker and window glue, dries clear) I took my time and it went together fairly well.

Overall:Â My final impression for this kit is that it isn’t really for a beginner but rather; a builder with some experience who takes their time will be able to produce a nice build and be proud of their model.
Right On Replicas, LLC ©2015 All rights reserved. *All registered trademarks are the property of their respective brands. Follow the manufacturer’s safety recommendations for any product mentioned here.

