1940 Ford Convertible 1:32 Scale Lindberg Model Kit #HL119 Review

2015 July 9
by Doug

Right On Replicas, LLC SnapShot Review 20150709*
1940 Ford Convertible 1:32 Scale Lindberg Model Kit #HL119 Review
3

Review and Photos by Alan Mann Alan Mann (Thumbnail)

The Ford line of cars was updated in 1937 with one major change, the introduction of an entry-level 136 CID (2.2 L) V8 in addition to the popular 221 CID (3.6 L) flathead V8. The model was a refresh of its predecessor, the Model 48, and was the company’s main product. At the start of production, it cost $850. The 1937 Ford featured a more rounded look with fine horizontal bars in the convex front and hood-side grilles. A high flat-topped hood dominated the front look of the 1940 model, as the grille spread out to reach the fenders to differentiate the Deluxe line. The standard Ford inherited the grille of the 1939 model with blackout on each side of a heavy chrome center; heavier headlight surrounds serve as another major differentiator from the 1939. 1940 was the last year of the 1937 design and its smaller V8 engine. The “Fat Fender” design became one of the favorites for “Hot Rodders” to customize. . Early stock car racing drivers also used Fords of this generation among other cars. This Ford also formed the basis for a style of dirt track racing car.


For the modeler: This Snapshot covers the Round2 Kit #HL119 re-release (Re-Pop) of the Lindberg ’40 Ford Convertible. This kit has seen a few releases and this is a replication of the original Box Art. There is no Skill Level listed but this would be a Skill 1 Level 2 for Moderate builders. The kit contains 31 parts molded in Red and Clear. As a Curbside kit there is no motor detail and interior detail is minimal. The whole build is about the body. This is a multiple part body and it would look best with  Bare Metal Foil as there is no Chrome at all, however, Silver paint can be used if you do not use Foil. The tires are two part Red Styrene plastic and not Vinyl. No decals are included in this build. The instruction sheet is a small booklet with fairly detailed pictures for the build process. This is not a difficult kit. Overall dimensions are: Length: 5-1/2”, Width: 2”, Height: 2”.


Construction:  begins with the body and interior. Paint work and assembly is difficult with this method as you must paint all the parts prior to construction and do all foil work and clear coats first. This means handling the finished body during construction and possibly damaging the finish. Take care while building this. For ease of painting assemble the sides, trunk and hood prior to painting 003 them. Use the chassis to line everything up but do not glue it to the chassis. For the tires Gravity Colors has a Tire Rubber paint that closely resembles actual tire colors and is quite easy to apply. For the grille, headlight bezels and bumpers Alclad II Chrome paint is a great alternative to Silver and gives a quite realistic Chrome look. Install the front suspension. Paint the chassis Flat Black and tape off the fenders. Paint the fenders Body Color. Paint the interior of the body Interior Color and the exterior Body Color. The interior is painted. The dash top is Body Color and the front panels Interior Color. The steering wheel is Interior Color. Paint the tire Whitewalls and Hubcaps.

 

Assembly is quite easy and quick with all the parts painted. On the chassis install the tires. Add the grille, headlights and bumpers. There are pins on the interior floor to install the interior in place. On the body install the glass with Elmer’s Glue. Add the dash in place. Final assembly is attaching the body to the chassis and adding the steering wheel and column.
5

Overall: Round2 continues to bring back the kits of yesterday with the Lindberg Line. For many of the older builders this give them a chance to relive the building methods from back in the early days of modeling. For the newer builders it is a glimpse into how it was done in the past. While the overall fit is not bad and assembly is fairly simple these kits were devoid of much of the details of the new products. This build is a curbside with no motor, very limited chassis details and the interior is overly simplistic. The multiple part body does make painting more of a challenge and I do recommend assembly prior to paint. I did decide to paint on the trim instead of foil it, even though the trim was defined enough to foil I had issues with my foil staying adhered in such a small strip. Once painted the car assembly is very fast, it is only a few parts to assemble. The finished build does make a nice shelf sitter but I would not enter it into a contest. One other use for these kits is that they adapt well to 1:32 scale slot car chassis.  Overall, I would give this one an 8 on a scale of 1 to 10.


Right On Replicas, LLC ©2015 All rights reserved. *All registered trademarks are the property of their respective brands. Follow the manufacturer’s safety recommendations for any product mentioned here.


Here is a reference to the two products I mentioned in this review:

http://gravitycolors.com/us/ This is a Hobby Use paint that is Airbrush Ready and offers an Automotive Use quality finish. You can order Automotive Brand specific colors and they will take requests. It is one of the easiest solvent based paints I have used.


http://alclad2.com/  This product has been around a while and widely known. It is an Airbrush Ready paint to give a more realistic look to Chrome. With a simple application and no buffing or polishing required it is one of the easiest Re-Chroming alternatives on the market.

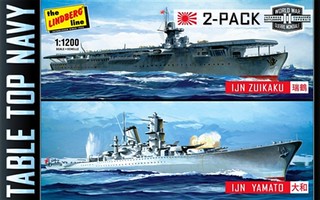
IJN Yamato and Zuikaku (2-Pack) 1:1200 Scale Lindberg Model Kit #HL424 Review

2015 July 8
by Doug

Right On Replicas, LLC SnapShot Review 20150708*
IJN Yamato and Zuikaku (2-Pack) 1:1200 Scale Lindberg Model Kit #HL424 Review
3

Review and Photos by Alan Mann Alan Mann (Thumbnail)

The origins of the Imperial Japanese Navy go back to early interactions with nations on the Asian continent, beginning in the early medieval period and reaching a peak of activity during the 16th and 17th centuries. The navy’s history of successes, sometimes against much more powerful foes as in the Sino-Japanese war and the Russo-Japanese War, ended in almost complete annihilation during the concluding days of World War II, largely by the United States Navy (USN).

Yamato was the lead ship of the Yamato class of Imperial Japanese Navy battleships. She and her sister ship, Musashi, were the heaviest and most powerfully armed battleships ever constructed, displacing 72,800 tons fully loaded. Named after the ancient Japanese Yamato Province, Yamato was designed to counter the numerically superior battleship fleet of the United States. She was laid down in 1937 and formally commissioned a week after the attack on Pearl Harbor in late 1941.

Zuikaku was a Shōkaku-class aircraft carrier of the Imperial Japanese Navy. Her complement of aircraft took part in the attack on Pearl Harbor that formally brought the United States into the Pacific War, and she fought in several of the most important naval battles of the war, before being sunk during the Battle of Leyte Gulf. One of six carriers to participate in the Pearl Harbor attack, Zuikaku was the last of the six to be sunk in the war (four in the Battle of Midway and Shōkaku in the Battle of the Philippine Sea).


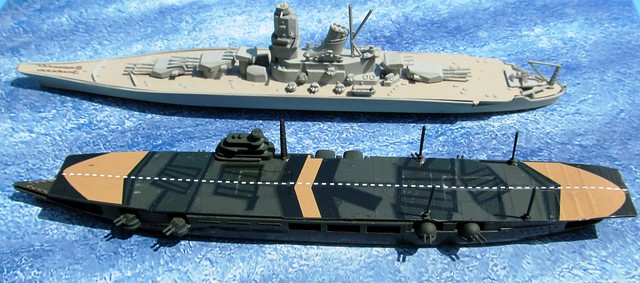
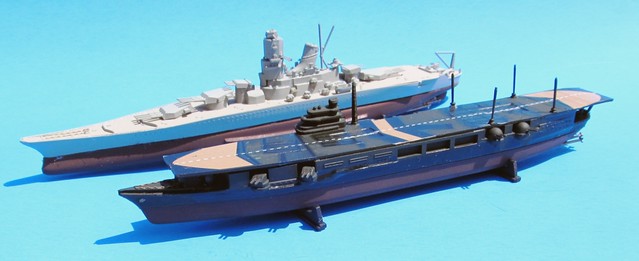
For the modeler: This review covers the Lindberg Value Pack # HL424 re-released (Re-Popped) by Round2. This is a Skill Level 2, for the intermediate builder. It is a 1:1200 scale kit and is released under Round2’s Table Top Navy Series. Each ship is bagged 1 separately with the Yamato molded in Gray and the Zuikaku molded in Pale Green. The idea is you can build these unpainted and get a nice somewhat correct look. I prefer to use Tamiya paint as they have JAPANESE NAVY GREEN and JAPANESE NAVY GRAY for more accurate colors. Each also includes a one-page instruction sheet and a waterslide decal sheet for the Zuikaku. The kits are well detailed at 1200 scale and can be assembled as either a waterline or full hull version.  Also included is a seascape platform for a waterline diorama.  Overall dimensions are: Yamato: Length: 9”, Width: 1”, Height: 2”. Zuikaku: Length: 8”, Width: 1”, Height: 1-1/2”.


The Models:  The Yamato construction begins with the lower hull section which has mating tabs in the base to line up the two halves and glue along the edge. The Zuikaku hull is solid. Paint the hulls with Hull Red. Next, carefully assemble the two halves of the upper hull sections in the same manner making sure all the edges match up. There are some seams on the hull section ends that you should 003 clean up and fill with some putty. You can leave the upper sections unpainted or use Japanese Navy Green on all of the other parts on the Zuikaku trees. On the Yamato the parts trees are Japanese Navy Gray and the deck is Deck Tan. If you’re building the full hull version attach the lower and upper hull sections together.  Use some rubber bands to keep them in place and set aside until dry. On the Yamato assemble the superstructure first with all the parts and add them on the deck surface. Add all the other parts to the top decks with some superglue starting around the superstructures and moving outward. On the Zuikaku attach the deck and superstructure to the hull. Now add all the remaining parts to the hull. Now apply the decals on the Zuikaku using plenty of water to ensure proper placement. Use some decal setting solution to soften them up for better conformance to the surface features. Carefully, turn the ships over and set them into a stand that won’t damage the topside details and add the props and rudders with some gel type superglue.  Touch those up with the hull red paint.  Paint the display stands black or place the waterline model on your sea surface diorama and you can display the ships proudly.

5

Overall: This set is a bargain as you get two complete kits in one box.  The detail is very good and the decals are excellent. Assembly goes well because all the parts fit together very nicely. Some parts are very small so use superglue and a pair of tweezers to help with placement.  There are some parts without positive contact points but the instruction’s diagrams make placement pretty clear. The decals float easily and adhere nicely, as they are fairly thin the detail does show through. Micro-Sol will help out with the deck decals greatly. These are a simplistic build and take about a day to construct. For the size and simplicity of these kits you get a very nice looking build. I think these rate a 9 on scale of 1 to 10 for a ship builder.


Right On Replicas, LLC ©2015 All rights reserved. *All registered trademarks are the property of their respective brands. Follow the manufacturer’s safety recommendations for any product mentioned here.

53 Foot Smooth Side Trailer with Reefer 1:25 Scale Moebius Model Kit #1303 Review

2015 July 7
by Doug

Right On Replicas, LLC Step-by-Step Review 20150707*
53 Foot Smooth Side Trailer with Reefer 1:25 Scale Moebius Model Kit #1303 Review
000
(Trailer ONLY Kit – Tractor NOT Included)

Review and Photos by Alan Mann  Alan Mann (Thumbnail)

 A semi-trailer is a trailer without a front axle. A large proportion of its weight is supported either by a tractor (Semi) or by a detachable front axle assembly known as a dolly. A semi-trailer is normally equipped with legs, called “landing gear”, which can be lowered to support it when it is uncoupled. Semi-trailers vary considerably in design, ranging from open-topped haulers to refrigerated enclosures known as Reefers. Semi-trailers are more popular for transport than full trailers, which have both front and rear axles. Ease of backing is cited as one of the semi’s chief advantages.


For the Modeler: This review covers the New Release of the Moebius Smooth Side Trailer Kit #1303. This is a 1/25 scale kit with a Skill Level 3 rating for Advanced Builders. It contains over 130 parts molded in White, Chrome and Clear with Vinyl tires. This kit does share many of its parts with its sister kit (Kit #1302) the 53 foot trailer with Corrugated side panels. Moebius Models’ 53-Foot Trailer kit features all the details of the real thing. There is a highly accurate undercarriage featuring cross-members with angle-braced landing gear and a tandem axle configuration. It has realistic soft tires that mount on blemish free Chrome rims. This version has the newer smooth side panels and optional refrigeration unit. The instructions are VERY DIFFERENT than the usual US kit on the market today.  The Instructions are an 8.5X11 book in full color! The front page is the box art in color with prerequisite warnings. The interior illustrates the construction sequences with written step-by-step build instructions. The Centerfold is a two full page Color diagram with all Decal callouts. The back page is a table that shows what parts are painted what color. The decals are basic and include only the marker stripes and basic Factory Markings. You get no company logos or custom decals in this version. Overall built dimensions are a massive size for this scale: Length: 26-1/2”, Width: 4-1/2”, Height: 6-1/2”. When paired with a tractor plan on some extra shelf space as you will need THREE FEET of length!


Covered in this Review:  If you want to perfect your build; basic construction; preparing parts for better finishing; alternate assembly sequence suggestions for fit and ease of finishing; complete paint and adhesive selections and applications; test fitting; version considerations; proper version decals application; ID map for drill out locations; paint thickness cautionary notes; rear door version selection; reinforcement bar slots; frame and chassis assembly and detailing; where NOT to use glue; landing gear options;  rear door/refer construction and detailing; tire/wheel construction and detailing; decal preparation and application; masking techniques for a proper finish;  dealing with heavy sprue tabs; detailing the marker lights for realism; positioning options for the gear crank; decal preparation and installation; box and side construction, alignment and color details; applying the photo-etch parts; are all fully examined in this 12 page, full-color Step-by-Step review in PDF format.


100% money back guarantee!

Click the Buy Now link below to purchase the full Step-by-Step review for $3.95 USD.


Important – You MUST click on the “Return to Right on Replicas, LLC” link after you’ve made your purchase to download your review!


Right On Replicas, LLC ©2015 All rights reserved. *All registered trademarks are the property of their respective brands. Follow the manufacturer’s safety recommendations for any product mentioned here.