USS Intrepid & USS North Carolina 1:1200 Scale Lindberg Model Kit #HL419 Review
Right On Replicas, LLC SnapShot Review 20150513*
USS Intrepid & USS North Carolina 1:1200 Scale Lindberg Model Kit #HL419 Review
Review and Photos by Doug Cole 
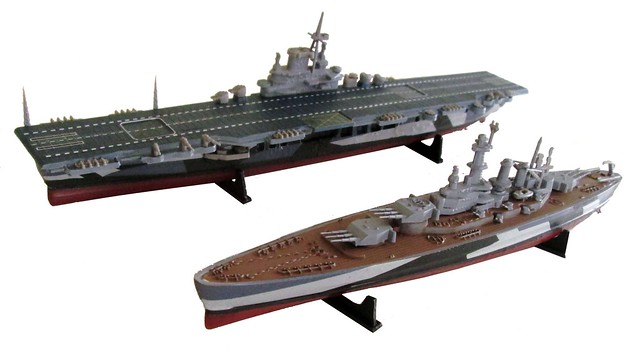
This Lindberg Table Top Navy Value Pack includes two complete ship model kits. It features the USS Intrepid Carrier (CV-11) and the USS North Carolina Destroyer (BB-55). The Intrepid was a highly decorated Essex Class Navy carrier launched in 1943. It saw action in WWII, the Cold War and Vietnam and also provided recovery operations for Mercury and Gemini space missions. The USS North Carolina, launched in 1940, was the first new style battleship to enter WWII. It was engaged in every major naval offensive in the Pacific and won 15 battle stars.
Â
For the modeler: This review covers the Lindberg Value Pack # HL419. This is a Skill Level 2, for the intermediate builder. It is a 1:1200 scale kit and is released under Round2’s Table Top Navy Series. The North Carolina kit has 37 parts and the  Intrepid has 49 pieces, both molded in grey styrene plastic. Each also includes a one-page instruction sheet and a waterslide decal sheet. The kits are well detailed at 1200 scale and can be assembled as either a waterline or full hull version.  Also included is a seascape platform for a waterline diorama. Overall dimensions are: USS Intrepid, Length: 8½” and North Carolina, Length: 6¾”
Â
The Models: Each model is molded on a single tree and there is minimal flash on the parts. The decal sheet has sea camo motifs for both models and additional deck decals for the Intrepid.
Construction begins with the lower hull section (omit this out if you’re planning a waterline display) which has mating tabs at the base so carefully line up the two halves and glue the edges in a couple spots with some slow setting tube glue then fill the seams with superglue and an accelerant. When dry, paint the hull with some anti-fouling red. Next, carefully assemble the two halves of the upper hull section in the same manner making sure all the edges match up. Tape off the lower edge of the upper hull and paint a 1/16†black line around the base. There are some seams on the hull sections that you should clean up and fill with some putty.
You can leave the upper sections unpainted or use an ocean gray here and on all of the other parts on the trees. If you’re building the full hull version, use a slow setting tube glue to mate the lower and upper hull sections together. Use some rubber bands to keep them in place and set aside until dry . The decks are next. Paint the North Carolina’s deck tan and the Intrepid’s deck ocean blue. After they’ve dried assemble the superstructures first with all their parts and add them to the deck surface. The two halves of the Intrepid’s superstructure have pronounced ejector pin marks (on the inside) so trim those off to ensure a good mate. There are some visible seams on the superstructures that you may wish to fill with putty and clean up also.  Add all the other parts to the top decks with some superglue starting around the superstructures and moving outward.
Paint the sides of the ships and the top deck of the carrier with a coat of Pledge with Future Shine floor polish to help prevent silvering of the decals. Now apply the decals using plenty of water to ensure proper placement. I started with the ocean camo decals.  To install them, I cut them into three smaller sections along some natural vertical lines to help reduce wrinkling. Match up the edges and use some  decal setting solution to soften them up for better conformance to the surface features. If there are any gaps or areas (like the sides of the deck structures on the battleship) that you want covered, use some matching sea camo paints to add that detail. On the carrier deck use plenty of water to allow the decals to float into the correct position. Then dry off the excess with a paper towel or soft cloth. Carefully, turn the ship over and set it into a stand that won’t damage the topside details and add the props and rudders with some gel type superglue. Touch those up with the hull red paint. Paint the display stands black or place the waterline model on your sea surface diorama and you can display the ships proudly.

Overall: This set is a bargain as you get two complete kits in one box. The detail is very good and the decals are excellent. Assembly goes well because all the parts fit together very nicely. There is a little warp in the decks but when mated to the hull sections they straighten right out. Sectioning the ocean camo decals will aid installation. Some parts are very small. Thick superglue and a pair of tweezers will help with placement. There are some parts without positive contact points but the instruction’s diagrams make placement pretty clear. Using a silver pencil or fine tip marker to pick out details on the battleship will enhance the look of that model too. I can’t find anything bad to say about this kit. The ships built easily and look great and I think you’ll like them too.
Right On Replicas, LLC ©2015 All rights reserved. *All registered trademarks are the property of their respective brands. Follow the manufacturer’s safety recommendations for any product mentioned here.

