Jupiter C Rocket 1:48 Scale Glencoe Model Kit #05130 Review

2015 May 2
by Doug

Right On Replicas, LLC Step-by-Step Review 20150502*
Jupiter C Rocket 1:48 Scale Glencoe Model Kit #05130 Review

Review and Photos by Robert Byrnes

000 The Jupiter-C rocket was originally developed to test the ablative re-entry nose cone of the Jupiter IRBM, although its satellite-launching capabilities were recognized at the time it was designed.  When used as a satellite launching vehicle, the Jupiter-C is sometimes referred to as the Juno-I.


The vehicle consists of a modified Redstone ballistic missile topped by three solid-propellant upper stages. The tankage of the Redstone was lengthened by eight feet to provide additional propellant. The instrument compartment is also smaller and lighter than the Redstone’s. The Robert Byrnes P47 Thumbnail second and third stages are clustered in a “tub” atop the vehicle, while the fourth stage is atop the tub itself. The second stage is an outer ring of eleven scaled-down Sergeant rocket engines; the third stage is a cluster of three scaled down Sergeant rockets grouped within. These are held in position by bulkheads and rings and are surrounded by a cylindrical outer shell. The webbed base plate of the shell rests on a ball-bearing shaft mounted on the first-stage instrument section. Two electric motors spin in the tub at a rate varying from 450 to 750 rpm to compensate for thrust imbalance when the clustered motors fire. The rate of spin is varied by a programmer so that it does not couple with the changing resonant frequency of the first stage during flight.


The upper-stage tub was spun-up before launch. During first-stage flight, the vehicle was guided by a gyro-controlled autopilot controlling both air-vanes and jet vanes on the first stage by means of servos. Following a vertical launch from a simple steel table, the vehicle was programmed so that it was travelling at an angle of 40 degrees from the horizontal at burnout of the first stage, which occurred 157 seconds after launch. At first-stage burnout, explosive bolts fired and springs separated the instrument section from the first-stage tankage. The instrument section and the spinning tub were slowly tipped to a horizontal position by means of four air jets located at the base of the instrument section. When the apex of the vertical flight occurred after a coasting flight of about 247 seconds, a radio signal from the ground ignited the eleven-rocket cluster of the second stage, separating the tub from the instrument section. The third and fourth stages were fired in turn to boost the satellite and fourth stage to an orbital velocity of 18,000 miles per hour.


For the modeler: This is a Skill Level 2 Glencoe 1/48 Scale Jupiter C Rocket model kit #05103 review.  Originally released by Hawk Models in 1958, the kit was re-released by Glenco Models in September of 2009. This kit is molded in 60 light gray pieces and comes 000b with assembly instructions and waterslide decals. The kit also features two launch crew figures and a pocket clip shaped like the completed model.  You can still find these kits available at larger hobby stores or online model kit retailers.   When complete, the Jupiter C stands almost 20” tall


Covered in this Review:  If you want to perfect your build; basic construction; preparing parts for better finishing; abrasive choices; clamping methods; using Alclad paint for realistic effects; color band masking techniques; using floor polish for decal application; sealing the decals with Pledge Future; fabricating a missing part; clamping methods; finishing the miniature display pin; seam identification and repair; complete paint and adhesive selections and applications; test fitting; constructing and finishing the display base; expanded history and specifications; where “NOT” to use glue; detailing the satellite; are all fully examined in this 17 page, full-color Step-by-Step review in PDF format.


100% money back guarantee!

Click the Buy Now link below to purchase the full Step-by-Step review for $4.95 USD.


Important – You MUST click on the “Return to Right on Replicas, LLC” link after you’ve made your purchase to download your review!


Right On Replicas, LLC ©2015 All rights reserved. *All registered trademarks are the property of their respective brands. Follow the manufacturer’s safety recommendations for any product mentioned here.


M-50 Ontos 1:32 Scale Renwal/Revell Model Kit #85-7823 Review

2015 April 29
by Doug

Right On Replicas, LLC Step-by-Step Review 20150429*
M-50 Ontos 1:32 Scale Renwal/Revell Model Kit #85-7823 Review
000


Review and Photos by James Yeager James Yaeger II Thumbnail

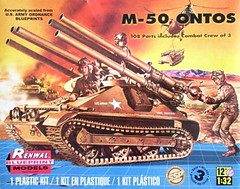
 Here’s  a fun fact: Ontos is the Greek word for thing. The M50 Ontos is a U.S. Light Armored Tracked Anti Tank Vehicle that had a GMC 302 six cylinder engine. The Ontos was designed to be transported by the cargo aircrafts the U.S. used during the 1950’s.This anti tank vehicle had six M40 106mm recoilless rifles that could be fired in a rapid succession. The secondary weapon was a 30 caliber machine gun. It weighed 8600 kg, had an effective firing range 2750m and had a maximum firing range 7700m. The Ontos was used in the Vietnam War until 1970 and in Operation Power pack (U.S. occupation of the Dominican Republic). The Ontos units were deactivated in 1969 and some of the Ontos were given to the Army Light Infantry Brigade. There was a second variant known as M50A1 which used a Chrysler 361 V8 engine. The U.S. Army canceled their order of the M50 Ontos after the prototypes testing however the Marine Corps ordered 297. The production cycle only lasted two years (1955-1957).


For the Modeler: This is the Revell/ Renwal kit 7823 that is 1: 32 scale, and a Skill Level 3. Revell released this kit before in 1982 after the original release by Renwal in the 1960’s and now Revell brings it back in 2015.000b The pieces are molded in olive drab, black vinyl track with water slide decals. There are 108 pieces to this kit and very well laid out instructions. According to Revell’s box this kit was “scaled from U.S. Army Ordnance blueprints. The dimensions are; 5″ L  X  3-3/8″ W  X  2-11/16″ H;  just the M50 Ontos, 5″ L  X  3-3/8″W  X  3-1/4″ H with the Loader.


Covered in this Review:  If you want to perfect your build; basic construction; preparing parts for better finishing; alternate assembly sequence suggestions for fit and ease of finishing; complete paint and adhesive selections and applications; test fitting; clarifying and correcting the instruction errors; identifying and repairing flash, seams, and sinks; assembling and detailing the road wheels; painting the interior; detailing the figures; weathering techniques and materials; rocket detailing; gun barrel assembly and installation; replacing some decals with paints for realism; copyright script removal; track assembly and installation; decal preparation and application; where “not” to use glue; are all fully examined in this extensive 13 page, full-color Step-by-Step review in PDF format.


100% money back guarantee!

Click the Buy Now link below to purchase the full Step-by-Step review for $4.95 USD.


Important – You MUST click on the “Return to Right on Replicas, LLC” link after you’ve made your purchase to download your review!


Right On Replicas, LLC ©2015 All rights reserved. *All registered trademarks are the property of their respective brands. Follow the manufacturer’s safety recommendations for any product mentioned here.

Ford F-150 SVT Raptor 1:25 Scale Revell Snap-Tite Model Kit #85-1977 Review

2015 April 27
by Doug

Right On Replicas, LLC Step-by-Step Review 20150427*
Ford F-150 SVT Raptor 1:25 Scale Revell Snap-Tite Model Kit #85-1977 Review
000

Review and Photos by Alan Mann  Alan Mann (Thumbnail)

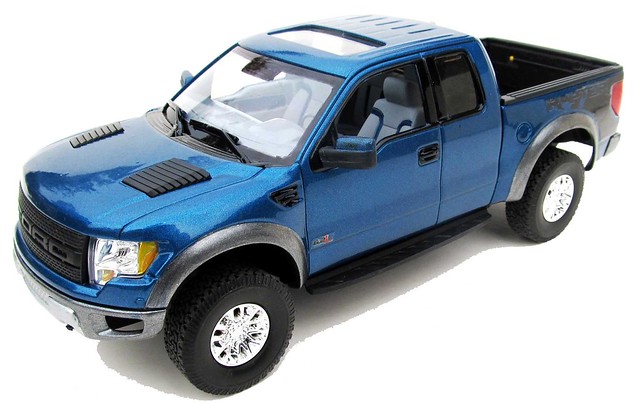
The twelfth-generation Ford F-Series is a light-duty pickup truck produced by Ford Motor Company from the 2009 to 2014 model years. On the outside, the design was restricted to evolutionary styling upgrades, with a larger grille and headlights bringing it in line with the styling of the Super Duty trucks and the interior saw the introduction of higher-quality materials in all but the most basic trim levels. The SVT Raptor entered showrooms in late 2009 as a dedicated off-roader, with sales being much better than expected. It was powered by a 5.4 L engine, with a 6.2 L option. It has Fox Racing Shox internal bypass shocks with external reservoirs which allows for 11″ of suspension travel in front, and 12″ in the rear. It comes standard with 35″ BF Goodrich All Terrain tires, and a rear Locking differential with a 4.10 gear ratio. From the A-pillar forward, the Raptor has a composite hood and fenders different from other F-150s and is missing the customary blue oval badge in the grille. SVT widened the track by 7 inches, and so its 5.5-foot box is unique to the Raptor as well. The Raptor’s height is 2 inches over a standard 4-wheel drive Super crew.


For the modeler: This review covers the 1/25 scale Revell Ford F-150 SVT Raptor Kit #1977. As this is a NEW MOLD RELEASE there are no prior versions of this kit available. This is a Snap-Tite kit and rated at Skill Level 1. The kit contains 49 parts molded in 000b Red, Black, Chrome, Clear, Clear Red and Clear Smoke and includes Vinyl tires and Metal axles. It has Stickers for decals. As a Skill level 1 Snap-Tite no glues are needed and painting is optional. There is no motor and all details are molded into the chassis pan. There is an extensive interior and the body is a multiple part unit. A Clear windshield is included but the back windows are Smoke to replicate Tint. Overall the truck is proportioned nicely and as noticed on many Social Media sites and Forums this popular truck is the base for many custom builds. Overall dimensions are: Length: 8-3/4″, Width: 3-15/16″, Height: 3-1/16″.


Covered in this Review:  If you want to perfect your build; basic construction; preparing parts for better finishing; alternate assembly sequence suggestions for fit and ease of finishing; abrasive choices; complete paint and adhesive selections and applications; making personalized license plates;  test fitting; using white glue for the window glass; detailing the tires for realism; chassis construction and detailing; mounting the body to the chassis; detailing the dashboard; add aftermarket flocking to the interior; making custom floor mats; detailing the windshield wipers for realism; customizing methods for a Snap type kit; detailing a bed liner;  taillight finishing techniques; adding real-looking fender flares; turn signal finishing colors; using floor wax to make crystal clear window glass; graphics sticker application; are all fully examined in this 15 page, full-color Step-by-Step review in PDF format.


100% money back guarantee!

Click the Buy Now link below to purchase the full Step-by-Step review for $2.95 USD.


Important – You MUST click on the “Return to Right on Replicas, LLC” link after you’ve made your purchase to download your review!


Right On Replicas, LLC ©2015 All rights reserved. *All registered trademarks are the property of their respective brands. Follow the manufacturer’s safety recommendations for any product mentioned here.