Right On Replicas, LLC Step-by-Step Review 20150424*
Project Vanguard Satellite 1:5 Scale Hawk Model Kit # HL603 Review
Review and Photos by Robert Byrnes  
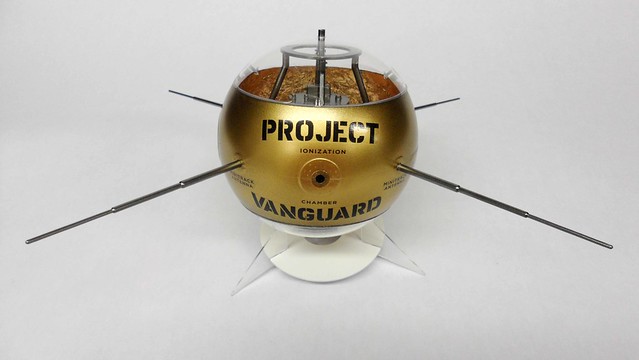
 Vanguard 1 was a small earth-orbiting satellite designed to test the launch capabilities of a three-stage launch vehicle and the effects of the environment on a satellite and its systems in Earth orbit. It also was used to obtain geodetic measurements through orbit analysis. Vanguard 1 was placed into orbit on 3/17/1958, into a 654 x 3969 km 134.2 minute orbit inclined at 34.25 degrees. Original estimates had the orbit lasting for 2000 years, but it was discovered that solar radiation pressure and atmospheric drag during high levels of solar activity produced significant perturbations in the perigee height of the satellite, which caused a significant decrease in its expected lifetime to only about 240 years. The battery powered transmitter stopped operating in June 1958 when the batteries ran down. The solar powered transmitter operated until May 1964 (when the last signals were received in Quito, Ecuador) after which the spacecraft was optically tracked from Earth.
For the modeler: This is a Skill Level 2 Project Vanguard Satellite 1:5 Scale Hawk Model Kit # HL603 Review. Released by Hawk Models in 1958, the kit was re-released with its original box art in 1966.  In November of 2014, Round 2 Models rereleased it for us again. This classic kit from the Hawk models tooling vault presents an early speculative look at the satellite. It is molded in opaque gray and clear parts along with decals to label every aspect of the exploratory craft. Finished Dimensions are: 12†End of Antenna to the End of the Opposing Antenna, 6†Tall sitting on the Base
Covered in this Review: If you want to perfect your build; basic construction; preparing parts for better finishing; abrasive choices; clamping methods; using Alclad paint for realistic effects; color band masking techniques; using floor polish for exceptionally clear glass effects; advanced decal application methods; using clear glue for invisible joins; ionization chamber detailing; adding foil effects to the Solar Aspect Cell; sealing the decals with Pledge Future; using foil to simulate insulation; seam identification and repair; sectioning the antennae for a superior finish; complete paint and adhesive selections and applications; test fitting; realistic antennae finishes; constructing and finishing the display base; detailing the instrument package; expanded history facts; where “NOT†to use glue; detailing the satellite interior for realism; are all fully examined in this 20 page, full-color Step-by-Step review in PDF format.
100% money back guarantee!
Click the Buy Now link below to purchase the full Step-by-Step review for $3.95 USD.
Important – You MUST click on the “Return to Right on Replicas, LLC” link after you’ve made your purchase to download your review!
Right On Replicas, LLC ©2015 All rights reserved. *All registered trademarks are the property of their respective brands. Follow the manufacturer’s safety recommendations for any product mentioned here.
Right On Replicas, LLC Step-by-Step Review 20150423*
KettenKraftrad with Infantry Cart & Goliath Demolition Vehicle 1:48 Tamiya Kit #32502 Review
Review and Photos by James Yeager 
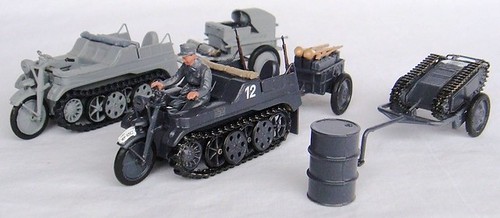
The Kettenkraftrad was designed in 1939 and was originally for the German Airborne to use as a small towing vehicle that also had multiple purposes. The Kettenkraftrad became very popular throughout the German Army and soon it was doing anything from taxing jets to the runway to hauling equipment and even hauling artillery. The Kettenkraftrad had a 4 cylinder 1478cc Opel Olympia engine that could get up to 36HP. It had three forward gears and one reverse gear and could handle very well on off road situations. The Kettenkraftrad could pull close to 4  tons of weight. The first place the Kettenkraftrad was used was during the invasion of Crete in 1941 from there it served all through Europe, in North Africa and on the Eastern Front. The Infantry Cart was designed to replace the older wooden cart which was much heavier. The replacement was a much lighter model that not only could be towed by the Kettenkraftrad, a motorcycle, a horse but by two soldiers as well. The Goliath, Sd.Kfz.302: While occupying France the German Army found plans by a French manufacturer Keggresse about a little device that transported explosives. The Borgward Company created the Goliath off of the research the Germans did of that manufacturer. The Goliath had two electric motors and carried 60kg of explosives and weighed 370kg. The remote control was done with an 800m long cable. The Goliath was introduced at Sebastapol in Southern Russia in 1942 however until 1943 it was not formally used during combat, after that it was used for attacking defensive positions or clearing mines from the roads. There were 2650 of these devices built by January 1944.
For the modeler: This is the Skill Level 2 Tamiya kit #32502 in 1: 48 scale. The pieces are molded in tan with water slide decals. There are 88 pieces to this kit and very well laid out instructions. The dimensions are; 2 5/8 L X 7/8 W X 1 3/8 H just the Kettenkraftrad and the German Driver, 3 15/16L X 7/8W X 1 3/8 H with the cart and German Driver, 5 1/8 L X 7/8W X 1 3/8H with the Goliath and the German Driver, 2 5/8 L X 17/8w X 1 H just the Kettenkraftrad no driver, and 2 5/8 L X 7/8W x 1 5/16H just the Kettenkraftrad and the Mauser Kar 98K’s with no driver.
Covered in this Review: If you want to perfect your build; basic construction; preparing parts for better finishing; alternate assembly sequence suggestions for fit and ease of finishing; abrasive choices; complete paint and adhesive selections and applications; test fitting; detailing the gauges; modifying the trailer for cart usage; painting the driver figure; finishing instructions for the munitions and accessories; expanded history facts; where “NOT†to use glue; suspension and track construction; detailing the wheels for realism; livery  choices; are all fully examined in this 9 page, full-color Step-by-Step review in PDF format.
100% money back guarantee!
Click the Buy Now link below to purchase the full Step-by-Step review for $2.95 USD.
Important – You MUST click on the “Return to Right on Replicas, LLC” link after you’ve made your purchase to download your review!
Right On Replicas, LLC ©2015 All rights reserved. *All registered trademarks are the property of their respective brands. Follow the manufacturer’s safety recommendations for any product mentioned here.
Right On Replicas, LLC Step-by-Step Review 20150422*
HighJacker Off-Road Custom Van 1:20 Scale MPC Model Kit #813
Review and Photos by Alan Mann 
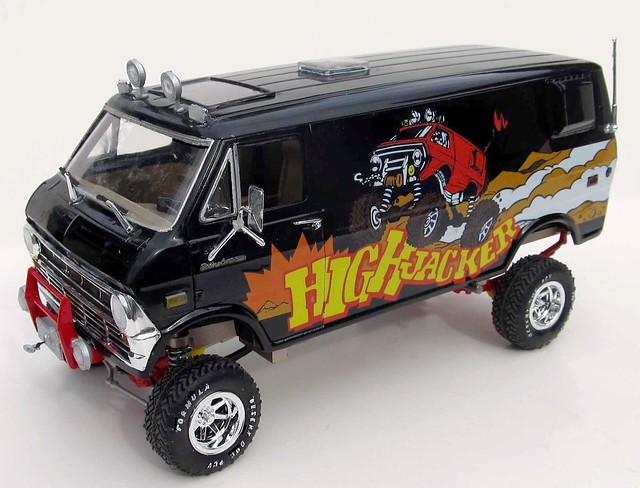
 The Econoline is a line of full-size vans (both cargo and passenger) from the Ford Motor Company. The line was introduced in 1961 as a compact van and its descendants are still produced today. Though the E-Series (Econoline) has been its own unique platform since 1968, it uses many components from the F-Series line of pickup trucks. While this was a rear wheel drive vehicle there were custom builders that would do a 4×4 conversion to the vans. They were called Quadravans and were produced by aftermarket companies for Ford Motor Company and Ford Dealerships. Individuals also would do these 4×4 conversions using the front suspension parts from the F-Series Pickups.
Â
For the modeler: This build review covers the Round2/MPC kit #MPC813 Ford Econoline HighJacker Off Road  Custom Van molded in 1/20 scale. The kit is a direct re-release (Re-Pop) from the original molds and has not been in production since the 70’s. Contents  consist of over 200 parts molded in White, Clear and Clear Red, Chrome and with Vinyl tires. The build is highly detailed with interior parts for a custom camping style conversion. The motor has multiple parts and very detailed. The body is a 1974 version of the Econoline van and has opening rear and side doors. The chassis is a conversion 4×4 and has nice off-road tires, although the tires are more suited for a 1/24 scale 4×4 as they are too small for this truck. There is a large decal sheet with mural panels for the van sides. The instruction sheet is typical of the earlier MPC offerings in the 70’s and a bit simplified but easy to follow. The finished build is impressive with a little bit of weight and size to it. Overall measurements are: Length: 9-1/2â€, Width: 4â€, Height: 5â€.
Â
Covered in this Review: If you want to perfect your build; basic construction; preparing parts for better finishing; alternate assembly sequence suggestions for fit and ease of finishing; abrasive choices; complete paint and adhesive selections and applications; test fitting; repairing excess flash; mold seam identification and repair; using white glue for the window glass; suspension construction installation; detailing the tires for realism; additional firewall and chassis detailing; chassis construction and detailing; mounting the body to the chassis; locating the connection points; tire logo considerations; front and rear wheel hub identification;  detailing the dashboard;  optional parts considerations; making custom license plates; cutting out the roof openings; using foil to highlight the trim; where “not†to use glue; interior decoration and the use of wood tones; grouping parts out of sequence for better finishing; adding foil to highlight the body trim; turn signal finishing colors; engine color guide; coil spring detailing for realism; engine detailing; door and hinge assembly; body-interior-chassis installation method; combining instruction steps for better finishing; using floor wax to make crystal clear window glass; using superglue for delicate parts;  winch construction; decal preparation and application; using decal setting solutions for that “painted on†look; are all fully examined in this 22 page, full-color Step-by-Step review in PDF format.
100% money back guarantee!
Click the Buy Now link below to purchase the full Step-by-Step review for $3.95 USD.
Important – You MUST click on the “Return to Right on Replicas, LLC” link after you’ve made your purchase to download your review!
Right On Replicas, LLC ©2015 All rights reserved. *All registered trademarks are the property of their respective brands. Follow the manufacturer’s safety recommendations for any product mentioned here.


 In November of 2014, Round 2 Models rereleased it for us again. This classic kit from the Hawk models tooling vault presents an early speculative look at the satellite. It is molded in opaque gray and clear parts along with decals to label every aspect of the exploratory craft. Finished Dimensions are: 12†End of Antenna to the End of the Opposing Antenna, 6†Tall sitting on the Base


