Right On Replicas, LLC Step-by-Step Review 20150410*
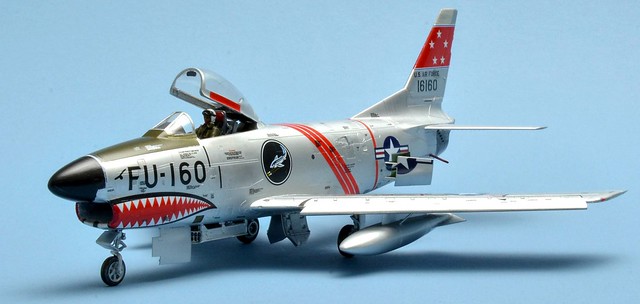
F-86D Sabre Dog 1:48 Scale Revell Model Kit #85-5868 Review

Review and Photos by Gordon Nielson 
Further development of the F-86 led to the radar-guided, rocket armed F-86D or Dog Sabre. This aircraft differed in so many ways that it received the designation YF-95A, but was classified as the F-86D. In the nose the F-86D carried an APS-6 radar for its role as an all-weather fighter. The fuselage was widened to provide room for the General Electric J47-GE-17 and could obtain a top speed of 707 mph at sea level. The 24 2.75 inch “Mighty Mouse†rockets were carried in a retractable tray in the fuselage and when firing would immediately extend only long enough for the missiles to clear. 2,504 F-86D’s were delivered to the Air Force beginning in March 1951. The F86D had a wingspan of 37 feet 1 inch, the length is 40 feet 4 inches and had a height of 15 feet. In the early 1950’s the F-86D established several new world speed records.
For the Modeler: This review covers the reissued North American F-86D Saber Dog 1:48 Scale Revell model Kit #85-5868. This is a much welcome kit compared to the older Lindberg kit. It is a skill level 3 plastic kit molded in light gray with a clear canopy containing 104 parts.  It includes waterslide decals for two aircraft. Detailed instructions feature a paint guide and numbered parts name list; a 13 step construction process and three step decal placement. Overall assembled size is: Length 10 1/8†x Wingspan 9 1/8â€.
Â
Covered in this Review: If you want to perfect your build; basic construction; preparing parts for better finishing; extensive paint and finishing information; adhesive selections and applications; cockpit construction and detailing; decal preparation and  application; cockpit and intake placement; complete pilot figure painting; identification and repair of sinks, flash, and ejector pin marks; adding nose weights; critical intake to fuselage alignment requirement; removing unwanted sprue tabs; applying pastel chalks; making the glass look real using Future floor wax; using gloss paint for decal application; identification and repair of the copyright script; buffing and handling a natural finish, canopy masking; decal selection, preparation, and application, and repairs; instruction clarifications; using setting solutions for great looking decals; handling small parts easily; are all fully examined in this pictorial 11 page, full-color Step-by-Step review.
Click the Buy Now link below to purchase the full Step-by-Step review for $3.95 USD.
Important – You MUST click on the “Return to Right on Replicas, LLC” link after you’ve made your purchase to download your review!
Right On Replicas, LLC ©2015 All rights reserved. *All registered trademarks are the property of their respective brands. Follow the manufacturer’s safety recommendations for any product mentioned here.


