Honest John Missile with Kenworth Mobile Carrier 1:54 Scale Revell Model Kit #H-1821 Review

2015 March 17
by Doug

Right On Replicas, LLC Step-by-Step Review 20150317*
Honest John Missile with Kenworth Mobile Carrier 1:54 Scale Revell Model Kit #H-1821 Review
000

Review and Photos by Robert Byrnes  Robert Byrnes P47 Thumbnail

Rapid transportation of heavy loads has become a major factor in American industry.  For this reason special trucking equipment has been developed, and the Kenworth Diesel truck is recognized as one of the best examples.  Powered by a Cummins Diesel engine which develops 180 horsepower, at 2000 rpm, the Kenworth is able to haul large loads economically and at high speeds over mountainous terrain as well as long straight highways.  Through the extensive use of Aluminum in its construction the designers have managed to keep the weight of the truck down to 13,750 lbs, thus enabling it to haul heavier payloads. These trucks are seen moving cargo of all sorts.  This Revell model is shown transporting an Honest John Missile from the Douglas Aircraft Plant to an Army Depot.  Dismantled and crated, the Missile is loaded on a flatbed trailer manufactured by Fruehauf Trailer Company, one of the world’s largest manufacturer of trailers, and special missile handling equipment.  This 33 foot trailer features a specially designed springing system which utilizes torsion bars rather than the normal leaf spring arrangement.  A close examination of the model will show this is in exact detail.


For the Modeler: This review covers the Revell Model Kit #H-1821 in 1:54 scale. The original issue of this kit is dated 1955.  It has been re-released several times.  This model kit was manufactured in 1999.  You can find this kit in some full line hobby shops 000b or at online auctions pretty easily.  It is approximately a Skill Level 2 kit for the intermediate builder although skill requirements weren’t listed on these older model kits. This kit contains ~110 pieces molded in white (missile) and bright green plastic (carrier). This model features a detailed missile and Kenworth cab with a Fruehauf trailer and illustrated instructions with waterslide decals.  As an example of modern day heavy transportation equipment, the Kenworth-Fruehauf combination certainly warrants a spot in your Revell collection.  Remember; keep learning and have fun.  Final dimensions of the model are: 13.5” long X 2.5” tall X 2.0” wide.

 

Covered in this Review:  If you want to perfect your build; basic construction; preparing parts for better finishing; alternate assembly sequence suggestions for fit and ease of finishing; complete paint and adhesive selections and applications; test fitting; clarifying the instructions; identifying and repairing seams;  clamping methods; mounting methods for ease of painting; carrier crate assembly and detailing; detailing the figures; extensive weathering techniques for the wheels, trailer, and cab; making a carrier bed out of plywood for an authentic appearance;  using Alclad products for realistic finishes; using floor polish as a sealer; restoring a flat finish for authenticity; Fruehauf Carrier assembly; Scratch building a missing piece; Kenworth tractor assembly; decal preparation and application; where “not” to use glue; how to use decal setting solutions; are all fully examined in this extensive 31 page, full-color Step-by-Step review in PDF format.


100% money back guarantee!

Click the Buy Now link below to purchase the full Step-by-Step review for $4.95 USD.


Important – You MUST click on the “Return to Right on Replicas, LLC” link after you’ve made your purchase to download your review!


Right On Replicas, LLC ©2015 All rights reserved. *All registered trademarks are the property of their respective brands. Follow the manufacturer’s safety recommendations for any product mentioned here.

Matt & Debbie Hay’s Pro Street Thunderbird 1:25 Scale Revell Model Kit #85-4356 Review

2015 March 12
by Doug


Right On Replicas, LLC Step-by-Step Review 20150312*
Matt & Debbie Hay’s Pro Street Thunderbird 1:25 Scale Revell Model Kit #85-4356 Review
000

Review and Photos by Alan Mann Alan Mann (Thumbnail)

For over fourteen years Matt and Debbie Hay built award winning Pro Street Machines. In 1988 their bright Pink Pro Street Thunderbird started to win awards from coast to coast and was featured on national magazine covers. They sold the award-winning T-bird in 1991 but, in 2013, Matt and Debbie had the opportunity to re-purchase the car and completely restore it. The car has a 351 Cubic Inch V-8 with Hay-designed twin supercharger system, twin custom Davis radiators, and Alston 4-link rear suspension. Plus they raced the car with a fully detailed interior with fire extinguisher and stereo speakers. This was a Strip Racer with STYLE!

For the modeler: This review covers the Revell Kit #85-4356 Thunderbird Pro Street built by Matt and Debbi Hay. This is a 1/25 scale kit and is a Skill 3 for advanced builders. There are 126 parts molded in White, Chrome, Clear and Clear Red with Vinyl tires. 000b This is a direct Re-release (Re-Pop) and the kit copyright on the chassis is 1990, which was the First release. Then over the next several years the kit was packaged in a few different box arts. Also in 1990 a limited collector kit with a collector card was released to be sold in Wal-Mart stores only. Twenty-four years later in 2014 Revell re-issued the kit in the Original parts configuration. There is a highly detailed motor, nice chassis and full interior with separate parts for easy detailing. The body represents the car accurately and has very few mold lines. The chrome is bright and clean. The decals are crisp. The instructions are straight forward and well detailed with color callouts and part numbers. Overall the completed build dimensions are: Length: 8-5/8″, Width: 3-1/8″, Height: 2″.

Covered in this Review:  If you want to perfect your build; basic construction; preparing parts for better finishing; alternate assembly sequence suggestions for fit and ease of finishing; complete paint and adhesive selections and applications; test fitting; mold seam identification and repair; using white glue for the window glass; detailing the turn signals; suspension construction; detailing the tires for realism; frame construction;  detailing the window surrounds; engine construction and detailing; a correct wiring diagram; wiring the engine; building and detailing the interior; assembling and installing the roll cage; a gauge location map; finishing methods for the hood snorkel; contest model considerations; paint masking instructions; using “nail polish” for paint; correcting instruction errors; detailing the dashboard; using floor wax to make crystal clear window glass; where not to use glue;  decal preparation and application; using decal setting solutions for that “painted on” look; are all fully examined in this 18 page, full-color Step-by-Step review in PDF format.


100% money back guarantee!

Click the Buy Now link below to purchase the full Step-by-Step review for $2.95 USD.


Important – You MUST click on the “Return to Right on Replicas, LLC” link after you’ve made your purchase to download your review!


Right On Replicas, LLC ©2015 All rights reserved. *All registered trademarks are the property of their respective brands. Follow the manufacturer’s safety recommendations for any product mentioned here.

YF-23 US Jet Fighter 1:48 Scale Hobby Boss Model Kit #81722 Review

2015 March 3
by Doug

Right On Replicas, LLC SnapShot Review 20150303*
YF-23 US Jet Fighter 1:48 Scale Hobby Boss Model Kit #81722 Review
000

Review and Photos by Gordon Nielson Gordon Nielson

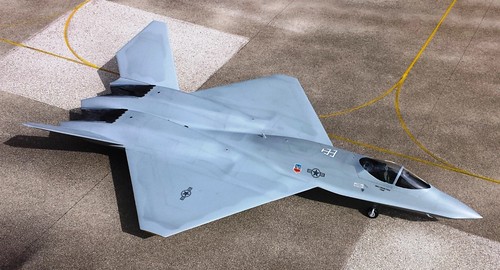
The YF-23 was a single seat, twin-jet stealth fighter designed by Northrop/McDonnell Douglas Corporations.  It was a design contest to counter the latest Russian SU-27 and  MiG 27 fighter designs.  As  a result of the USAF’s (ATF) competition, two prototypes were built; the Gray Ghost and the Black Widow II and the first test flight occurred in August of 1990. The aircraft were unconventional designs and featured trapezoidal wings that formed a diamond pattern when viewed from above.  Through competition with the Lockheed YF-22 design the YF-23 proved to be faster but less maneuverable and the project was cancelled. They now reside at museums YF-23A “Black Widow II” PAV-1 (S/N 87-800) is currently at the USAF Test Center Museum at Edwards Air Force Base, California and PAV-2 (S/N 87-801) is currently located at the Western Museum of Flight in Torrance, CA.


For the Modeler: The Hobby Boss YF-23 (kit # 81722) is a big model with a length of 17 ½ inches and a wingspan of 11 ½ inches. Each part tree is wrapped in plastic with clear parts being wrapped in foam and plastic. I really like that the part numbers were in 000b order and easy to locate on the sprues. Most of the parts in the kit go into the cockpit and landing gear assemblies, then the main fuselage halves and upper and lower wings. Assembly is pretty straight forward beginning with the cockpit and wheel well-landing gear, no real issues and parts went together well. The cockpit is well detailed and with the decal applied over the instrument panel the overall look is impressive. The ejection seat has the seatbelts molded onto the seat, I didn’t do it but I would recommend sanding them off and making and applying your own seatbelts for a more realistic look.


I wanted to pose the canopy open so that cockpit detail could be seen better but I could not find any photos showing the mechanisms for raising the canopy and how it would look so I went with the closed canopy. I added about ¾ ounces of weight behind the cockpit to hold the 000c nose down, then after gluing the wheel wells in place and the intakes, I proceeded to cement the fuselage halves together. Care needs to be taken trimming the sprue off of the nose halves and sanding the excess away so that the nose fits together correctly.  There are also ejector pin marks on the top and bottom fuselage that will need to be carefully sanded away. After the fuselage was together I cemented the wing halves and V Tail together, the wing-to-fuselage fit is pretty good but still needed a little help and persuasion. The V Tail has pins molded in and fits into holes in the tail section so they are movable. I would have liked to cut the flaps and pose them in a downward position but upon closer review this would have taken a great deal of careful surgery to accomplish, so I chose not to.


I sanded all the seams, masked the canopy and then washed the model with warm soapy water to clean off any dust or residue. After allowing the model to dry I painted it with Model Master Dark Ghost Gray and then after that dried I masked off the pattern and airbrushed on Model Master Light Ghost Gray. I then painted the exhaust and weathered the cooling tiles with pastel chalk. I also painted a few panels on top and bottom. I enhanced the panel lines with some black and white photographic touch-up pens.


I researched and referenced as many photographs as I could and sometimes still couldn’t find what I was wanting but in the process I noticed that there were antennae and lights that didn’t come with the kit and weren’t molded  into it. So I scratch built the antennae and lights.  001 I also noticed that depending on the time period that the pictures were taken some markings were different. So, since the YF-23 lost out to the YF-22 we’ll never know what squadron markings may have been used, so in many ways this gives the builder of this model the freedom to portray what might have been if they choose to. The decals that come with the kit are good and bad, I didn’t use the Tactical Air Command decals because for some reason the letters are just gibberish and the No Step decals seemed to have the lettering too large and while viewing pictures I could not see No Step stenciling; so I didn’t use them. I did apply the TAC decals and forward fuselage decals from an F-15E decal sheet that I had. I applied Gloss coat first and then after the decals were applied using Solvaset I sprayed on Dullcoat to finish up.


Overall: I am pleased with this model as I have waited a long time for a good kit to come out in 1/48 scale, I like the look and shape of this jet and wish it had gone into service. I am glad to add this to my collection and you will be too.

Right On Replicas, LLC ©2015 All rights reserved. *All registered trademarks are the property of their respective brands. Follow the manufacturer’s safety recommendations for any product mentioned here.