Lancia Stratos HF (1976 Sanremo Rally Car) 1:24 Scale Hasegawa Model Kit #20200 Review

2014 November 17
by Doug

Right On Replicas, LLC Step-by-Step Review 20141117*
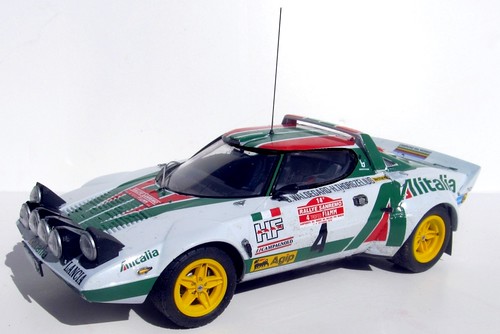
Lancia Stratos HF (1976 Sanremo Rally Car) 1:24 Scale Hasegawa Model Kit #20200 Review
000

Review and Photos by Alan Mann Alan Mann (Thumbnail)

 The Lancia Stratos HF was designed from the ground up to compete in Rally racing, and proved very successful in the 1970’s and early 1980’s. It started a new era in rallying as it was the first car designed from scratch for this kind of competition. The three leading men behind the entire rallying project were Lancia team manager Cesare Fiorio, British racer/engineer Mike Parkes and factory rally driver Sandro Munari. The bodywork was designed by the head designer at Bertone, and the technical layout was loosely based on a Lancia concept car called Stratos Zero. In 1971 Lancia presented the Lancia Stratos HF prototype, Chassis 1240. It featured a distinctive crescent-shaped-wrap-around windshield providing maximum forward visibility with almost no rear visibility. Lancia did extensive testing with the Stratos and raced the car in several racing events where Group 5 prototypes were allowed during the 1972 and 1973 seasons. Production of the 400 cars required for homologation in Group 4 were launched in 1973 and the car was homologated for the 1974 World Rally Championship.

For the modeler: This review covers the Hasegawa Kit #20220 Lancia Stratos HF in 1/24 scale. The kit consists of 148 parts molded in White, Black and Clear with Rubber tires, a sheet of Rubber and Photoetch parts. The decals are Cartograf. A highly detailed 10 page instruction sheet is included but as this is a Japanese brand kit English is only added as a secondary language. The sample kit I have is dated 2004 and is a Re-release (Re-Pop) and is available in this version as well as a Street car and other race variants at online auctions and hobby shops.  Build up is a typical chassis then interior then body assembly. The overall car is White with decals creating the Green and Red paint on the body. There is no motor, this is a Curbside kit. The interior is a race car so it is sparse but well detailed with decals on what parts exist. The chassis does assemble solid and the front wheels are able to turn and pose. The body is very detailed with both decals and photoetch, but this is the better style photoetch on runners that is much easier to work with. The quality of the kit is very nice with no flash or severe mold lines. Overall size is Length: 6-3/8”, Width: 3-3/16”, Height: 2”.

Covered in this Review:  If you want to perfect your build; basic construction; preparing parts for better finishing; alternate assembly sequence suggestions for fit and ease of finishing; complete paint and adhesive selections and applications; test fitting; preparing and installing the photo etch parts; where NOT to use glue; fire extinguisher detailing; using floor polish for spectacular window glass;  preparing the floor plate for rollbar installation; installing the Euro plates; using “clear” glue for glass parts; detailing the engine bay; dashboard detailing; authentic interior color scheme and masking; front and rear suspension build sequence; team version considerations; using decal setting solutions; chassis installation; a gauge panel location map; detailing the wheels for realism; window surround detailing; making realistic tires; suspension detailing; and an expanded vehicle history; are all fully examined in this 16 page, full-color Step-by-Step review in PDF format.


100% money back guarantee!

Click the Buy Now link below to purchase the full Step-by-Step review for $3.95 USD.


Important – You MUST click on the “Return to Right on Replicas, LLC” link after you’ve made your purchase to download your review!


Right On Replicas, LLC ©2014 All rights reserved. *All registered trademarks are the property of their respective brands. Follow the manufacturer’s safety recommendations for any product mentioned here.

Little Joe 2 1:72 Scale RealSpace Models Kit Review

2014 November 14
by Doug

Right On Replicas, LLC SnapShot Review 20141114*
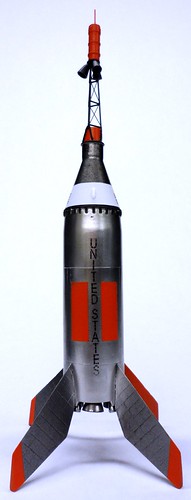
Little Joe 2  1:72  Scale RealSpace Models Kit Review

Review and Photos by Robert Byrnes

000
The Little Joe 2 was a test vehicle for the Mercury space capsule. It carried the Rhesus monkey Sam (Macaca mulatta) close to the edge of space. He was sent to test the space equipment and the adverse effects of space on humans.  The flight was launched December 4, 1959, at Robert Byrnes P47 Thumbnail 11:15 a.m. ET from Wallops Island, Virginia, United States. Little Joe 2 flew 55 miles (88 km) into space. It was recovered, with the monkey intact, in the Atlantic Ocean by USS Borie. Sam was one of a series of monkeys in space. Sam, from the School of Aviation Medicine in San Antonio, Texas, received his name as an acronym of the facility. The flight time was 11 minutes, 6 seconds, with a payload of 1,007 kg. The boilerplate Mercury spacecraft used in the Little Joe 2 mission is currently displayed at Airpower Park and Museum, Hampton, Virginia.
  The Kit:

Kit Includes 15 Resin parts, 1 Photoetch Brass part, and Decals.  RealSpace provides 2 Capsules.  The boiler Plate and the Production Mercury Capsule.  You can build any one of the Little Joe Rockets.  I built this in about a week.  Fairly simple, easy to work with resin parts that are cleanly molded and required little work prior to paining.

All parts were washed with a soap and water to remove mold release that was applied when the resin parts were cast.

I carefully bent the Photoetch Escape Tower into shape, then painted it with Testors Acryl Flat Black.  The Escape Tower Rocket Housing resin part was primed with Tamiya Gray Primer then painted with Testors Acryl International Orange.  This Rocket Housing was then glued onto the Escape Tower using thick super glue.

The Capsule is resin and was primed with Tamiya Gray Primer, followed by a coat of Alclad Gloss Black, then Alclad Airframe Aluminum. 000b

The lower part of the Capsule was painted with Tamiya White Primer, and the very top with Testors Acryl International Orange.

The Rocket and Fins are also resin and were painted with Tamiya Gray Primer, followed by Alclad Gloss Black, then Alclad Chrome.  The Identifiers were masked and painted with Testors Acryl International Orange.  Panel Lines were sprayed with Alclad Airframe Aluminum.  The top ring was hand painted with Testors Acryl Flat Black.  Decals were applied per instructions.

The resin Rockets were painted with Tamiya Gray Primer, followed by Alclad Gloss Black, then Alclad Stainless Steel.

Everything was held together using thick Super Glue. I made the display base from a wood plaque that I filled with light weight spackle and primed with Tamiya Primer followed by a coat of Alclad Gloss Black.  The Label was printed on my printer.


Right On Replicas, LLC ©2014 All rights reserved.  *All registered trademarks are the property of their respective brands. When using products mentioned here follow the manufacturer’s safety guidelines.

Alpine Renault A110 (Monte-Carlo 1971) 1:24 Scale Tamiya Model Kit #24278 Review

2014 November 12
by Doug

Right On Replicas, LLC Step-by-Step Review 20141112*
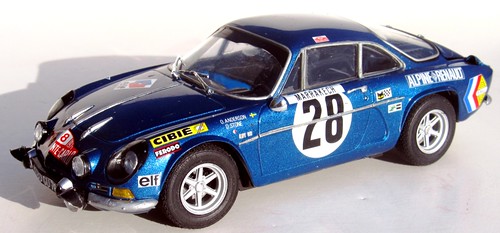
Alpine Renault  A110 (Monte-Carlo 1971) 1:24 Scale Tamiya Model Kit #24278 Review
000

Review and Photos by Alan Mann Alan Mann (Thumbnail)

Shortly after World War II most of the European car manufacturers were decimated, with France suffering the worst. Parts were in short supply as was funding, and few if any of the smaller car manufacturers had survived the conflict. A few were able to rebuild their businesses after the war although this was not helped by the taxation system of the country imposing penalties for cars with engine displacements larger than 2.8 litres. The cars that replaced the bigger pre-war vehicles also did not last long, leaving the sporting French drivers with little option but to purchase foreign cars or modify their existing Renaults, Simcas, Peugeots and Citroens. The Berlinette A110 was introduced in 1963 and was still in production some ten years later. It underwent a variety of engine capacities. The Alpine Renault A110 raced in rallies around the world from the late 1960’s through to the early 1970’s. The rear wheel drive A110 featured a lightweight FRP body and was powered by a rear mounted 4-cylinder engine. In the 1971 Monte Carlo Rally, this compact design and a powerful 1,600cc engine allowed quick, agile running on the icy mountain tracks, giving the A1110 1st, 2nd and 3rd place for a clean sweep of the podium.


For the modeler: This build review covers the Tamiya Kit#24278 Alpine Renault A110. The car is a 1/24 scale and while Tamiya does not use Skill Levels it recommends 10 years old and over. The kit has 110 parts molded in Grey, Metallic Blue, Chrome and Clear 000bwith Rubber tires, Poly Caps, Cartograf decals and Photoetch along with a nice ten-page instruction sheet. It is a fairly standard Tamiya product, and being from Japan, English is included but a secondary language. My sample is dated 2005 but as with most Tamiya products this is still widely available online and in some hobby stores. This kit has been released in multiple box arts as both a race car and a street car; the first release was in 1997 so this version is a Re-Release (Re-Pop). Tamiya has a standard build procedure on this with the motor, chassis, interior and then body. Parts are well detailed and there is little to no flash or blemishes. The body is the correct color with a high gloss, you could decal it and display it without painting if you desired. This is a small car for 1/24 scale as overall dimensions are: Length: 6-1/4”, Width: 2-1/2”, Height: 1-3/4”.


Covered in this Review:  If you want to perfect your build; basic construction; preparing parts for better finishing; alternate assembly sequence suggestions for fit and ease of finishing; complete paint and adhesive selections and applications; test fitting; engine construction and detailing; installing “old style” photo etch parts; where NOT to use glue; rollbar installation; installing the Euro plates; using white glue for glass parts; detailing the engine bay; dashboard detailing; authentic interior color scheme and masking; front and rear suspension build sequence; version considerations; using decal setting solutions; chassis installation; painting the coil springs/ shocks for realism; window surround detailing; making realistic tires; suspension construction and detailing; are all fully examined in this 13 page, full-color Step-by-Step review in PDF format.


100% money back guarantee!

Click the Buy Now link below to purchase the full Step-by-Step review for $3.95 USD.


Important – You MUST click on the “Return to Right on Replicas, LLC” link after you’ve made your purchase to download your review!


Right On Replicas, LLC ©2014 All rights reserved. *All registered trademarks are the property of their respective brands. Follow the manufacturer’s safety recommendations for any product mentioned here.