Right On Replicas, LLC SnapShot Review 20141110*
Sputnik 1 1:12 Scale RealSpace Models Kit Review

Review and Photos by Robert Byrnes 
On October 4th 1957, the space age began in earnest, when the USSR launched Sputnik 1, a 184 pound artificial satellite. The satellite orbited the Earth and could be seen from backyards over much of the world and the radio signal could be heard on radio sets.
The Sputnik 1 satellite was a 58.0 cm-diameter aluminum sphere that carried four whip-like antennas that were 2.4-2.9 m long. The antennas looked like long “whiskers” pointing to one side.  The spacecraft obtained data pertaining to the density of the upper layers of the atmosphere and the propagation of radio signals in the ionosphere. The instruments and electric power sources were housed in a sealed capsule and included transmitters operated at 20.005 and 40.002 MHz (about 15 and 7.5 m in wavelength), the emissions taking place in alternating groups of 0.3 s in duration. The downlink telemetry included data on temperatures inside and on the surface of the sphere.
This kit commemorates the 50th anniversary of the first man-made object to orbit Earth.
The Kit:
Kit includes 6 resin parts and Aluminum Tubes. I built this in 3 evenings using Tamiya Primer, sanding with 600 grit sand paper, followed by Alclad Gloss Black and a top coat of Alclad Chrome. Fairly simple, easy to work with resin parts that are cleanly molded and required little work prior to painting. Everything was super glued together. The antenna bases were painted black and ceramic area painted with Testor’s acryl tan.
I made the display base from a wood plaque that I filled with lightweight spackle and primed with Tamiya Primer followed by a coat of Alclad Gloss Black. The label was printed on my printer.
Right On Replicas, LLC ©2014 All rights reserved. *All registered trademarks are the property of their respective brands. Follow the manufacturer’s safety guidelines when using any products mentioned here.
Right On Replicas, LLC Step-by-Step Review 20141106*
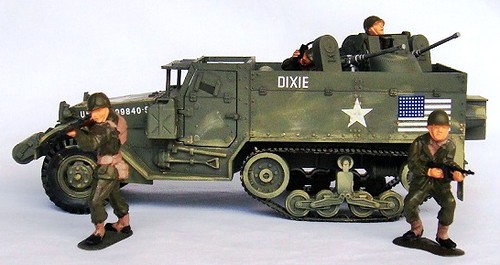
US Army Armored Half Track 1:35 Scale Monogram SSP Model Kit #85-0034 Review

Review and Photos by James Yeager 
The M16 Half Track was used in almost every portion of both World War II and the Korean War. The Half Track could be a troop carrier or have different types of armament installed onto it. This version has two 50 caliber machine guns with a power operated turret in the bed. As the Revell website puts it so graphically, “They hear the shriek – the thunderous combination of mechanical and natural noise as the Stuka turns into a dive, blazing fire at the column. These machines have torn apart Allied machines from France to the Crimea… but they won’t today. The powered mount traverses the gunner lines up the sights and hits the triggers. Quad .50 cal machine guns cut loose with a whirlwind of lead, sending the Swiss-cheese Stuka straight to the dirt. One down.†The half-track vehicle was a customizable mainstay of the battlefield for over thirty years.
For the modeler: This is a review of the Monogram US Army Armored Half Track with crew figures in a 1:35 Scale Selected Subjects Program (SSP) Model Kit #85-0034. It is  a  Skill Level 2 kit for the intermediate builder molded in olive drab green, clear, black vinyl tires and water slide decals. There are 84 pieces to this kit and very well laid out instructions. This kit contains the original parts of the first issue and an anti-aircraft variant half-track with gunner, driver and crew figures. The dimensions are; 7†L X 2½†W X 2¼†H. With the turret and machine guns installed the kit is 7†L X 2½†W X 2-7/8†H.
Covered in this Review: If you want to perfect your build; basic construction; preparing parts for better finishing; alternate assembly sequence suggestions for fit and ease of finishing; identifying and removing unwanted flash; complete paint and adhesive selections and applications; test fitting; front and rear suspension construction; track installation techniques; Battalion version considerations; identifying and removing unwanted script; replacing the kit driveshaft for accuracy; paint mixing ratios for authentic color; removing unwanted labels; windshield construction and appropriate adhesive; bogey wheel assembly; painting the crew figures; decal application and finishing; are all fully examined in this 16 page, full-color Step-by-Step review in PDF format.
100% money back guarantee!
Click the Buy Now link below to purchase the full Step-by-Step review for $3.95 USD.
Important – You MUST click on the “Return to Right on Replicas, LLC” link after you’ve made your purchase to download your review!
Right On Replicas, LLC ©2014 All rights reserved. *All registered trademarks are the property of their respective brands. Follow the manufacturer’s safety recommendations for any product mentioned here.
Right On Replicas, LLC Step-by-Step Review 20141103*
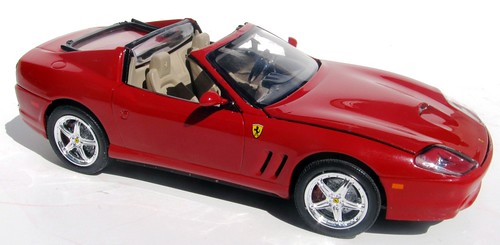
Ferrari Superamerica 1:24 Scale Revell of Germany Model Kit #07391 Review

Review and Photos by Alan Mann 
The history of the Ferrari Superamerica dates back to 1956-1961 when this unique convertible first made it appearance. Like its predecessor the new Ferrari Superamerica is a very unusual convertible. Produced in 2005 as a limited edition of only 559 units this vehicle touts some of the most sophisticated technological features ever seen in an automobile. The Superamerica is powered by a twelve cylinder 540 hp engine coupled to an optional Formula I transmission with the ability to go from 0 to 60 mph in 4.25 seconds. Its specialized transmission can be used in the automatic or manual mode as well as “normal†or “sports†at the driver’s discretion. Likewise its suspension is state of the art and can be adjusted between sporty or comfort at the flick of a switch. However, and without a doubt, the most high-tech feature on the Superamerica has got to be its “electronically controlled color change†convertible top. This unknown feature is a first of its kind ever used on a production automobile. Similar to the idea of eyeglasses that darken to sunlight the “Revocromico†top can be electronically adjusted from clear to almost black at the driver’s command. Overall the car has been designed as “user friendly†and is very easy to drive.
Â
For the modeler: This review covers the Revell of Germany kit #07391 a 1/24th scale Ferrari Superamerica that comes molded in 114 parts that are Gray, Red, Metallic Gray, Clear and with Vinyl tires. Revell rates this at a Skill Level 4 for experienced builders.  My sample is dated 2006 and is the first run of the model. It has been re-released since and is still available on the market in a few different box art versions. Typical quality by Revell of Germany, the kit includes a very nicely detailed engine/transmission and rear differential and axle. If desired this easily lends itself to additional detailing for Contest Quality builds. Also the interior is very nicely done. A piece of black screening is provided along with a template of shapes that are required to cover the side vents, the hood intake and the left rear fender intake. The body is multiple parts and you have no choice but to paint the body, the shell is Red but all other panels are Gray! Overall the kit is molded crisply with little if any clean up needed. The instruction sheet is equally well done and easy to follow. Overall dimensions are: Length: 7â€, Width: 3â€, Height: 2-1/4â€.
Covered in this Review:Â If you want to perfect your build; basic construction; preparing parts for better finishing; alternate assembly sequence suggestions for fit and ease of finishing; complete paint and adhesive selections and applications; test fitting; detailing the engine bay; dashboard detailing; authentic interior color scheme; wheel spindle orientation; front suspension build sequence; using flocking to simulate carpeting; making custom floor mats and license plates; dashboard detailing; Euro vs. US version considerations; using decal setting solutions; modifying the hood for function; chassis installation; painting the shocks for realism; where NOT to use glue; correctly orienting directional tires; window surround detailing; making realistic tires; engine construction and detailing; suspension construction and detailing; are all fully examined in this 14 page, full-color Step-by-Step review in PDF format.
100% money back guarantee!
Click the Buy Now link below to purchase the full Step-by-Step review for $3.95 USD.
Important – You MUST click on the “Return to Right on Replicas, LLC” link after you’ve made your purchase to download your review!
Right On Replicas, LLC ©2014 All rights reserved. *All registered trademarks are the property of their respective brands. Follow the manufacturer’s safety recommendations for products mentioned here.


 The spacecraft obtained data pertaining to the density of the upper layers of the atmosphere and the propagation of radio signals in the ionosphere. The instruments and electric power sources were housed in a sealed capsule and included transmitters operated at 20.005 and 40.002 MHz (about 15 and 7.5 m in wavelength), the emissions taking place in alternating groups of 0.3 s in duration. The downlink telemetry included data on temperatures inside and on the surface of the sphere.


