How to Build a Vacuform (vacuum-formed) Scale Model

Right On Replicas, LLC Step-by-Step Review 20140730*
How to Build a Vacuform (vacuum-formed) Scale Model

Review and Photos by Doug Cole  
If you’ve been building models for a while you’ve probably heard the term “vacuform kit.†As opposed to the usual injection molded kits that are so common these 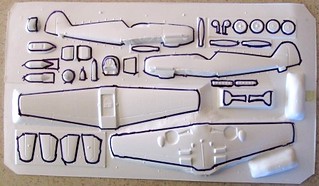 days, the vacuum molded kit is formed when a heated sheet of plastic is lowered onto a relief die and the air is vacuumed out to pull the plastic onto the die plate. The plastic then cools and conforms to the die plate. The result is a single sheet model kit that looks like this. The parts have been outlined in marker here to show them clearly.
Most people shy away from these kits as they clearly involve more work than just cutting the pieces off of the tree as you do with injection molded kits but there are some good reasons why you might want to consider building one. First off – it’s really not that hard to turn that plastic sheet into a really nice looking model (like the Messerschmitt Bf 109-E above). And secondly, there are quite a few models marketed as vacuform that the injection molders never made. Quite often odd or unusual models are found in the vacuform offerings that the main stream model companies would never consider producing. While they used to be quite common the only good source for vacuform kits is online as most of the mainline hobby stores only deal with high volume kits. A search for vacuform kits at online auction site will turn up a large number of these kits and you might just find one that would make a unique and unusual model for your display shelf.
Â
For the Modeler: This review is based on the Falcon Industries 1:48 Scale Messerschmitt Bf 109-E model kit although the techniques shown in this review can generally be applied to any vacuform model. This “kit†consists of one white plastic sheet of parts, two clear cellulose canopies, and a set of pictorial instructions. Details such as panel lines might not be as crisp as injection molds but they’re acceptable. Some scratch building is required on the part of the builder. In this kit, simple parts such as the main wheel struts, tailplane struts, and aerial are not included and will have to be made or sourced from another kit by the builder. Another thing you’ll have to do is find or make decals for your model. Most of these kits were produced prior to the days of the color printer. Fortunately, there are a lot of aftermarket sources online nowadays for both accessory parts and decals to provide professional results for your vacuform model. Overall completed dimensions are Length: 7″, Width: 8″, Height: 2″.
Covered in this Review: If you want to perfect your build; basic construction; preparing parts for better finishing; extensive paint and finishing information; adhesive selections and applications; seam and sink identification and repair methods; decal selection, preparation, and application; how to use setting solutions for great looking decals; detailing and construction options; detailing the instrument panel; construction sequence deviations for fit and finish; contest finishing considerations are discussed; Â version considerations; installing windows with white glue; scratch building minor components; using aftermarket and kit bashed parts, are all fully examined in this pictorial 14 page, full-color Step-by-Step review.
 Â
Click the Buy Now link below to purchase the full Step-by-Step review for  $2.95 USD.
Important – You MUST click on the “Return to Right on Replicas, LLC” link after you’ve made your purchase to download your review!
Right On Replicas, LLC ©2014 All rights reserved.
*All registered trademarks are the property of their respective brands.
